Tarot T810 Build Log
I've been flying my DJI F450 for a couple of months now but have realised that it's to small for me, I want to be able to lift more and get longer flight times. I started to look at Tarot FY680 Pro but realised that it will be to small and I've heard that the foldable arms are flexing to much to get a really stable platform so I decided to go for the T810 instead.
Parts List
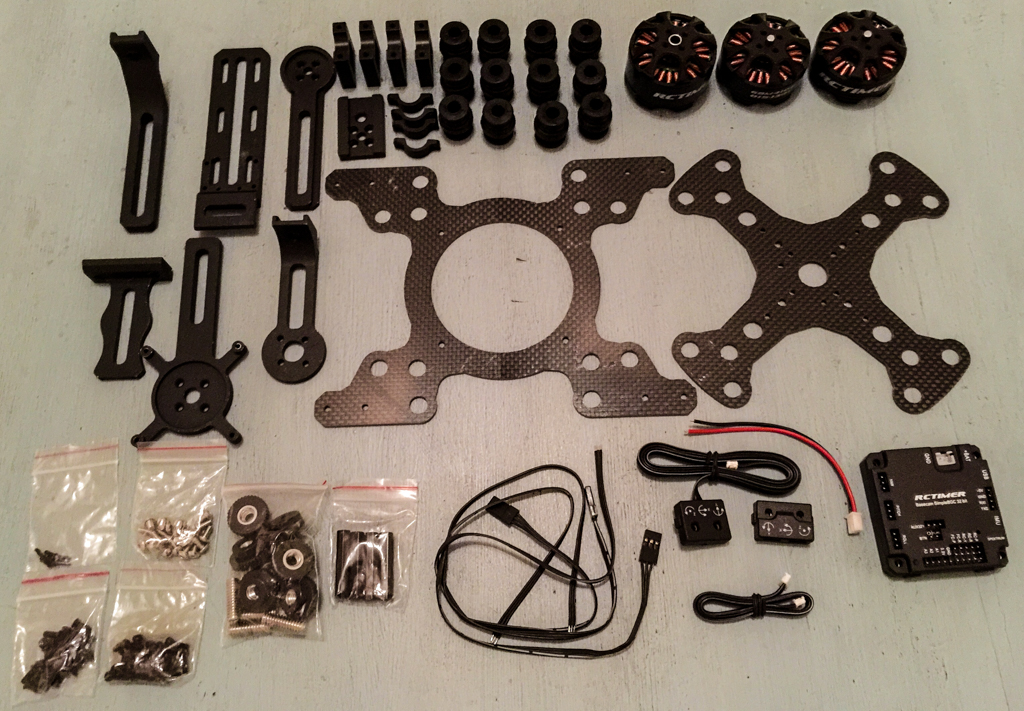
These are the parts I've bought so far
- Tarot T810 folding six-axis rack TL810A
- Tarot T810/T960 six-axis folding tripod TL96013
- Tarot T810/T960 mount dual battery under the seat TL96018
- Tarot T810/T960 gimbal mount kit TL96014
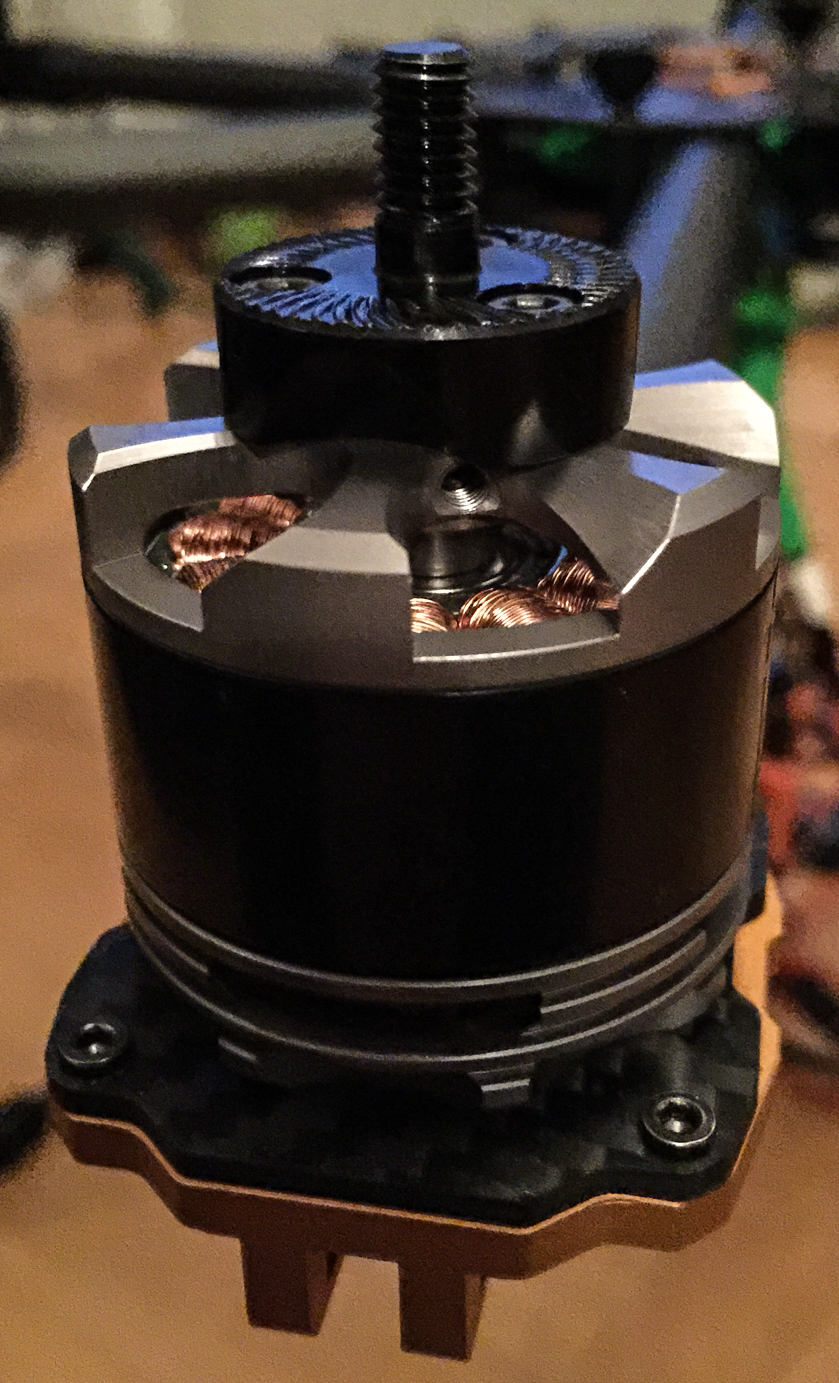
- 6xT-Motor MT3515 400KV
- 6xRCTimer SimonK Speed Controller ESC HVSK-40A
- Tarot T810/T960 gimbal mount kit TL96014
- Foxtech Supreme C/F Propeller(14x4.8) (Supreme 1448)
- DYS RC Model 300A Power Distribution Board
- 3DR Pixhawk with u-bloc GPS and compass
- 3DR Radio Telemetry Kit 433
- MinimOSD
- Multistar High Capacity 6S 10000mAh Multi-Rotor Lipo Pack
- LED Lily Pad (12LEDs RGB)
- Turnigy Receiver Controlled Switch
- FrSky 2.4GHz Accst Taranis X9D
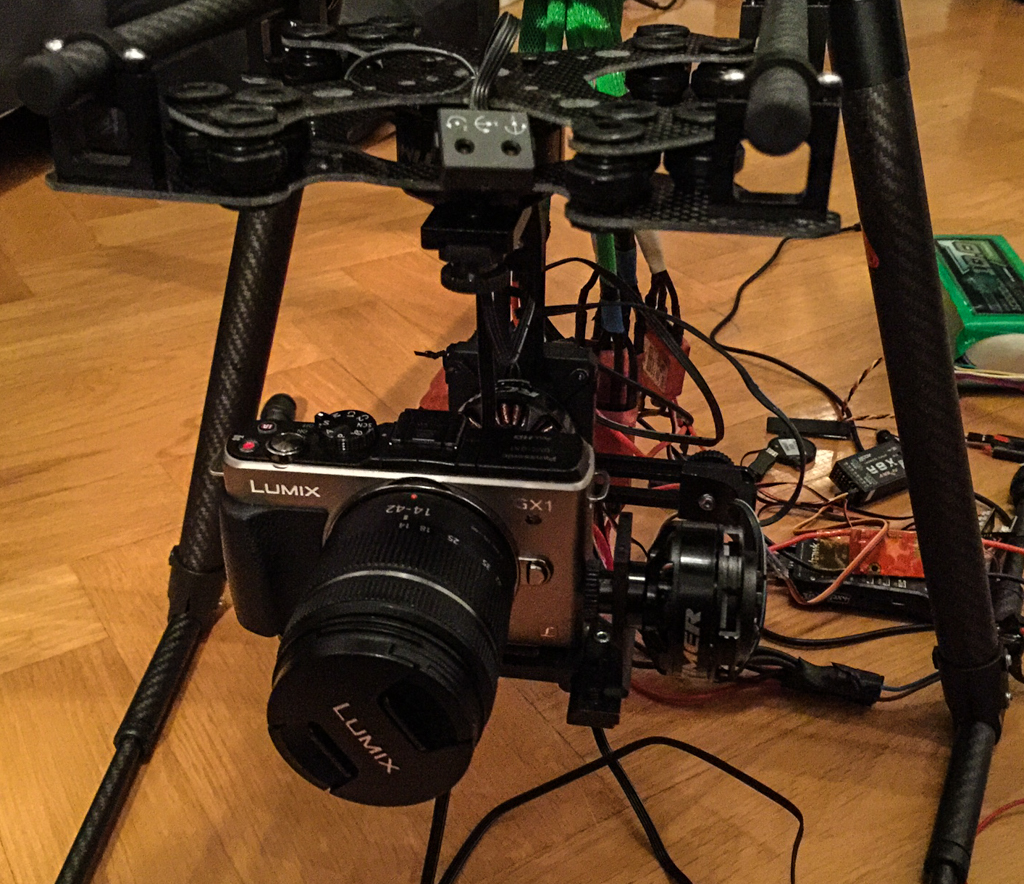
I will start to fly with my old DYS 3-axis SMART gimbal and GoPro Hero 3+ Black Edition but the plan is to buy a larger gimbal and a Canon EOS-M
Parts are starting to arrive
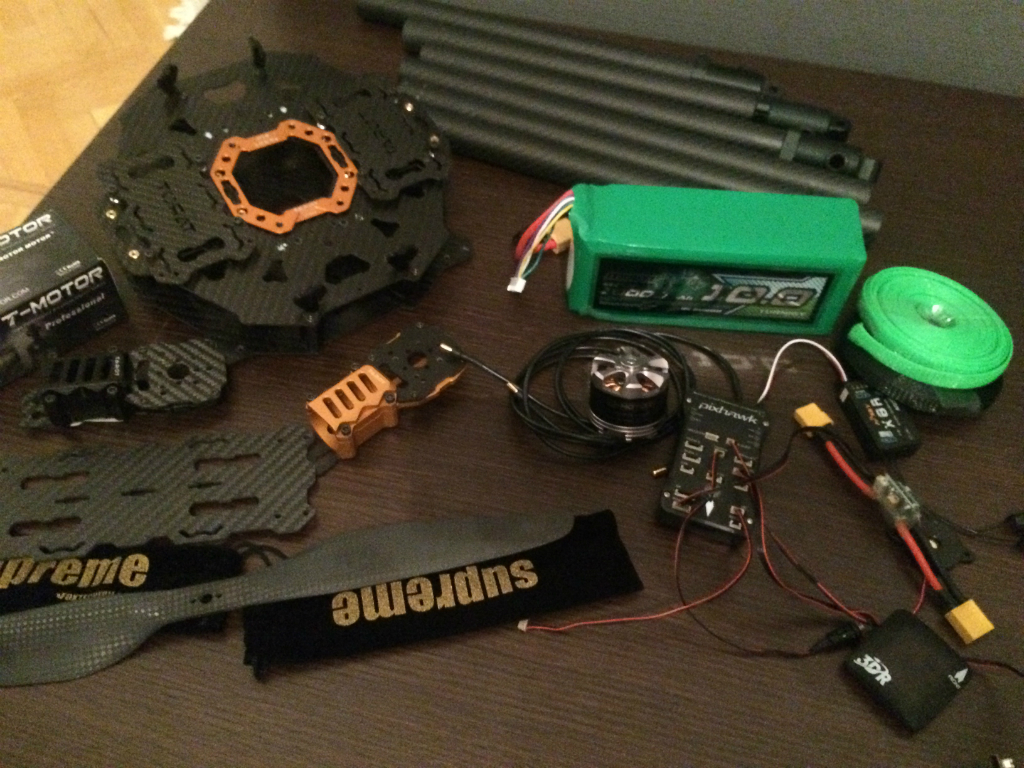
Finally the parts are starting to arrive, the frame is here, so are the motors, ESCs, power board and some more... I hope to be able to start the assembly.
Starting to put the parts together
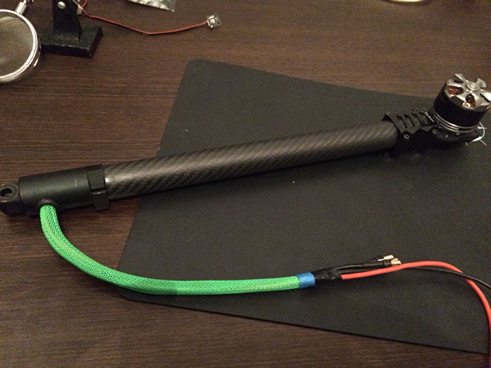
Started to put the arms together today, tested just one arm to see how everything fits. I will have LED Lily Pads from Ready to Fly Quads mounted on four of the arms, the front arms won't have any LEDs so they don't disturb the videos.
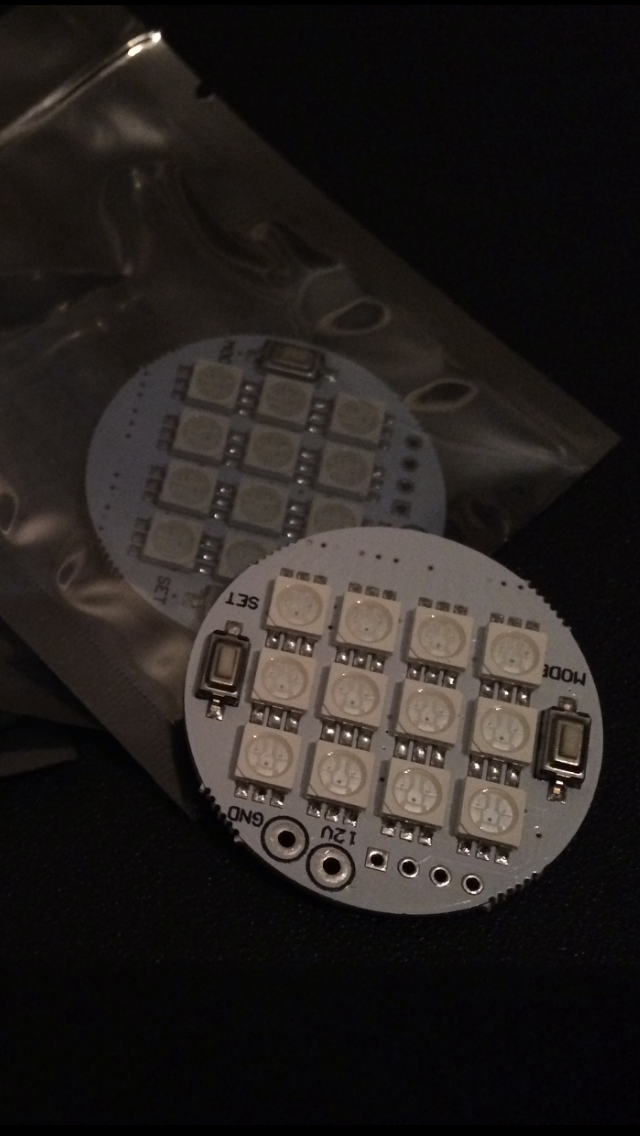
I haven't really decided how to mount the LEDs yet but they will probably sit inside the "cage"
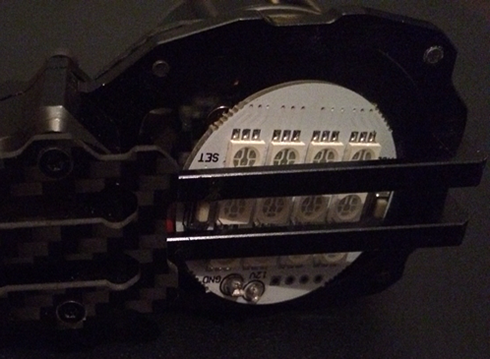
It's possible to choose several colors and modes on the leds but I haven't figured it out yet how to get the LilyPad to remember the settings when I disconnect the battery, I will connect the leds via a power switch so i can turn them on and off via the radio.
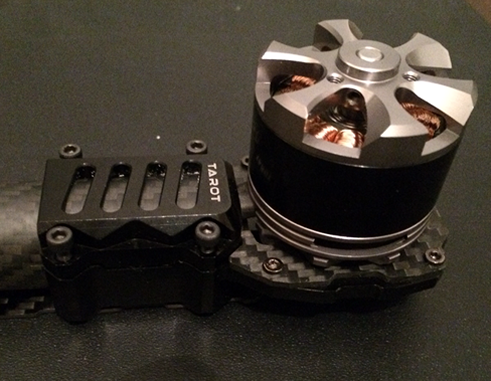
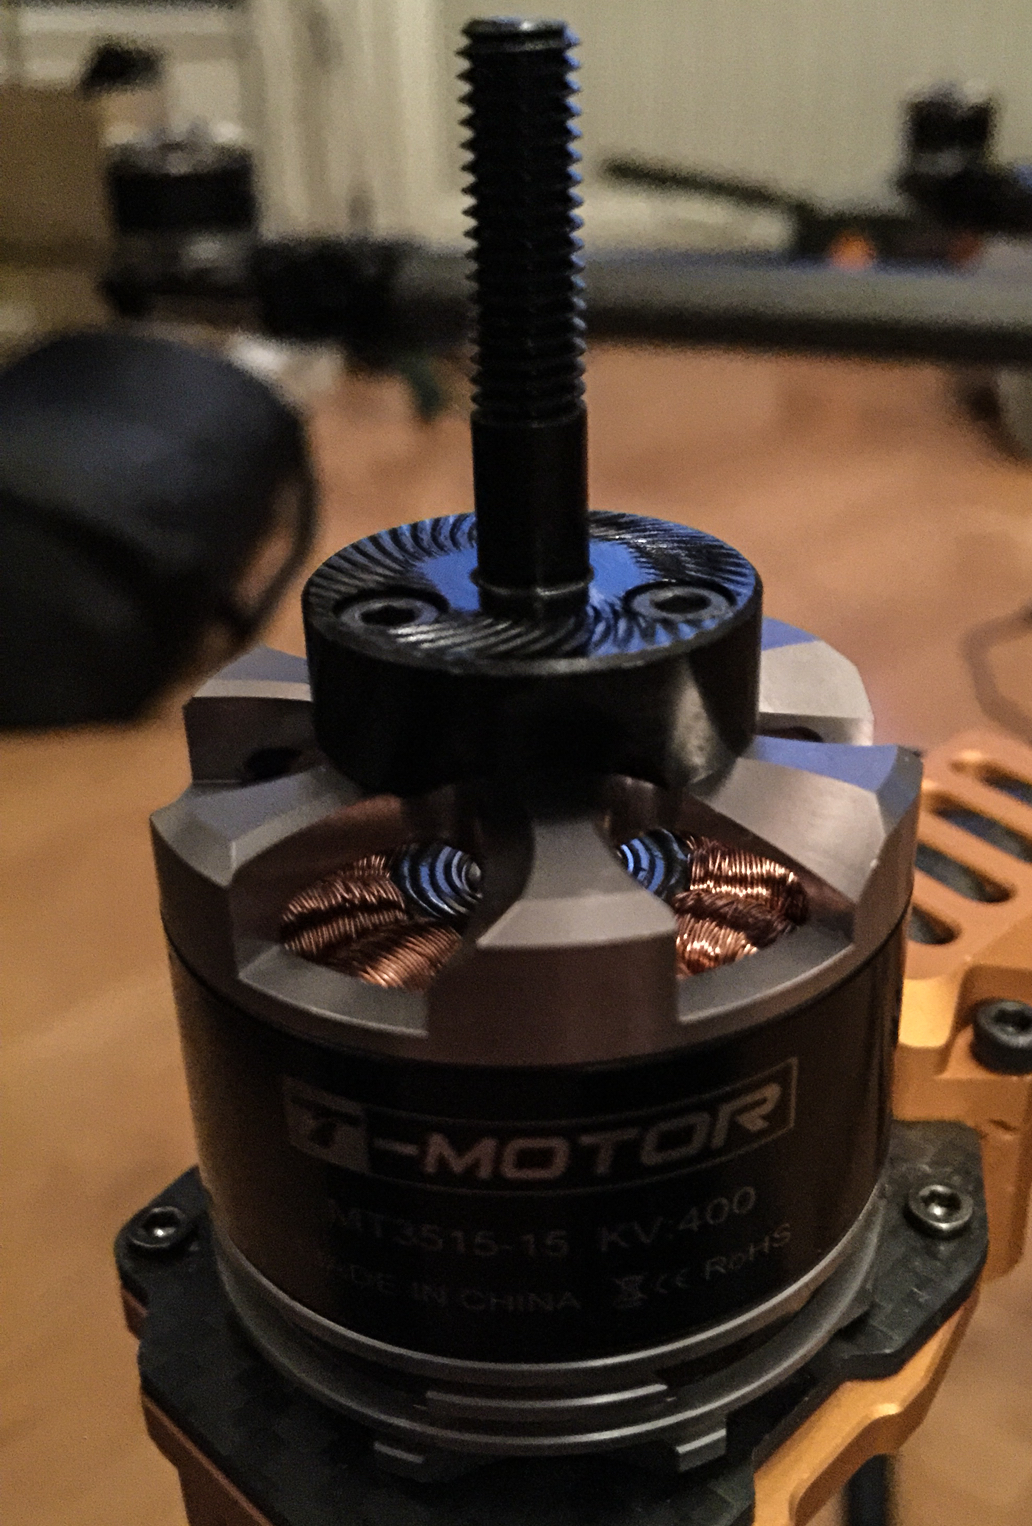
The motor is mounted just temporarily to check if everythinf fits, haven't used any locktite yet.
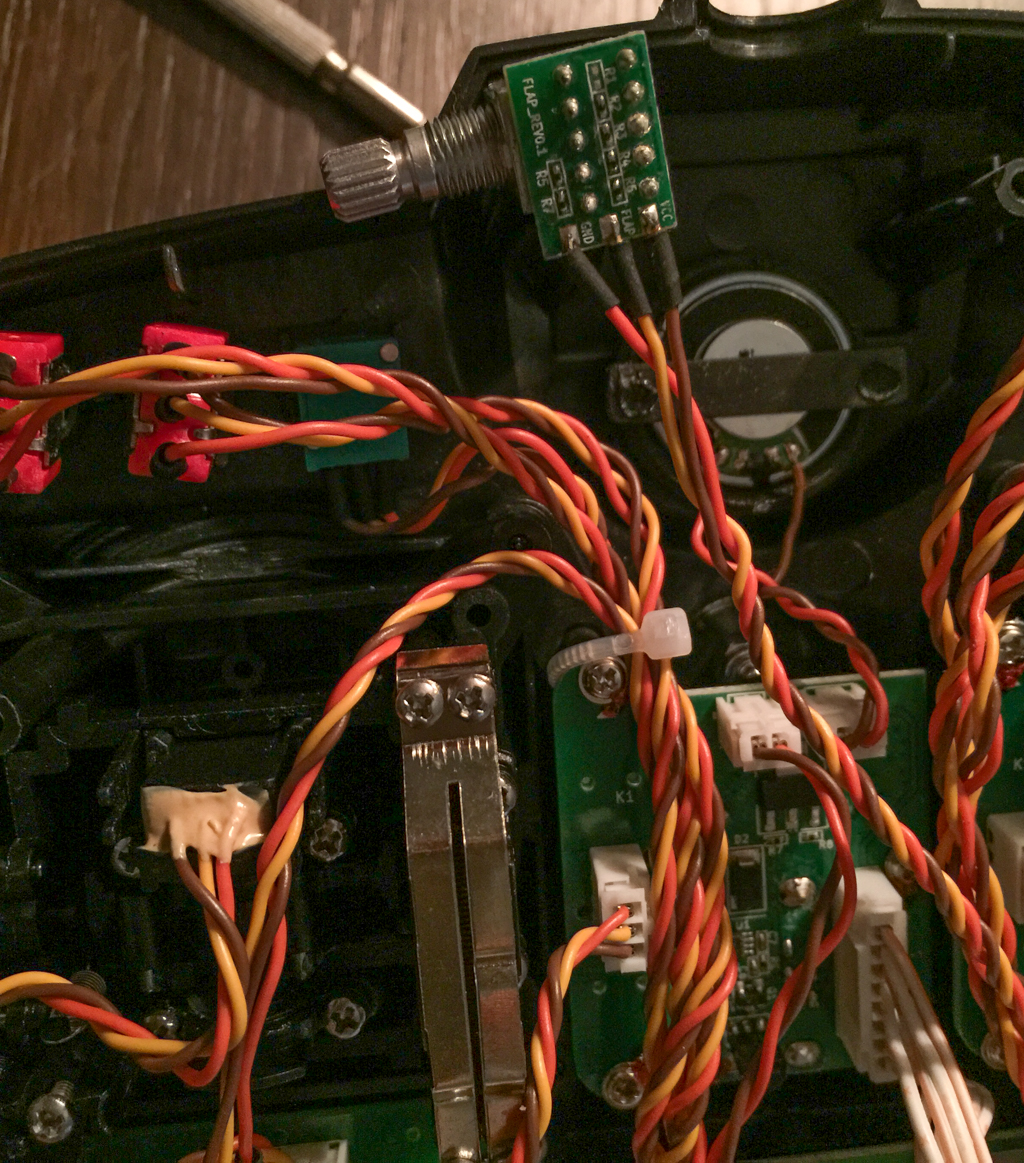
I will use braided sleeving to hold all the cables together, it was a little bit tricky to get everything through the small hole in the arm but it worked out quite well with some help from electrical tape and some wire.
Will try to put the rest of the arms during the week so I can mount them next weekend.
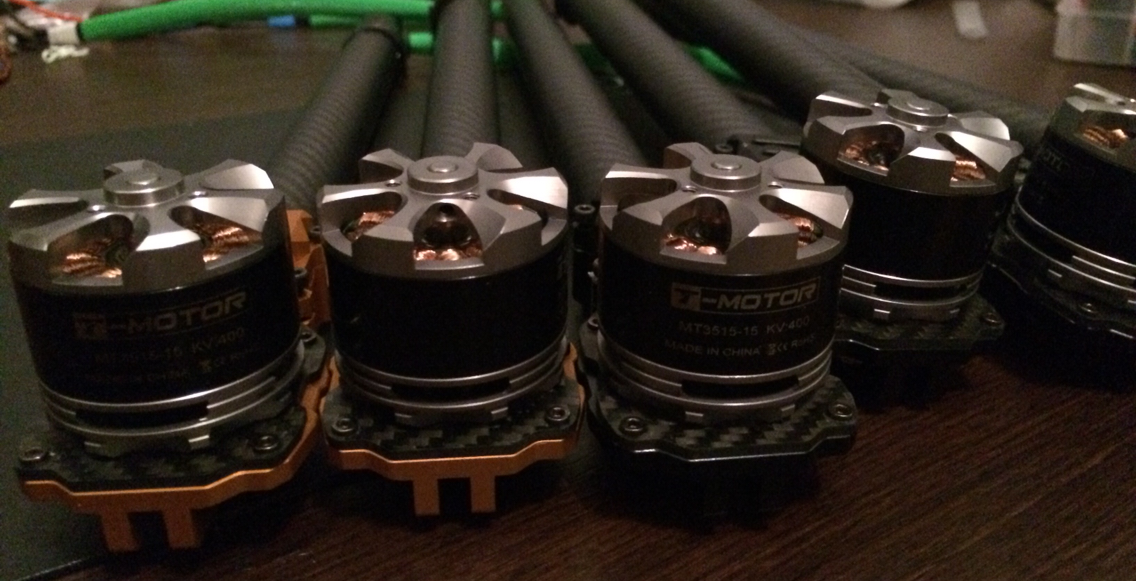
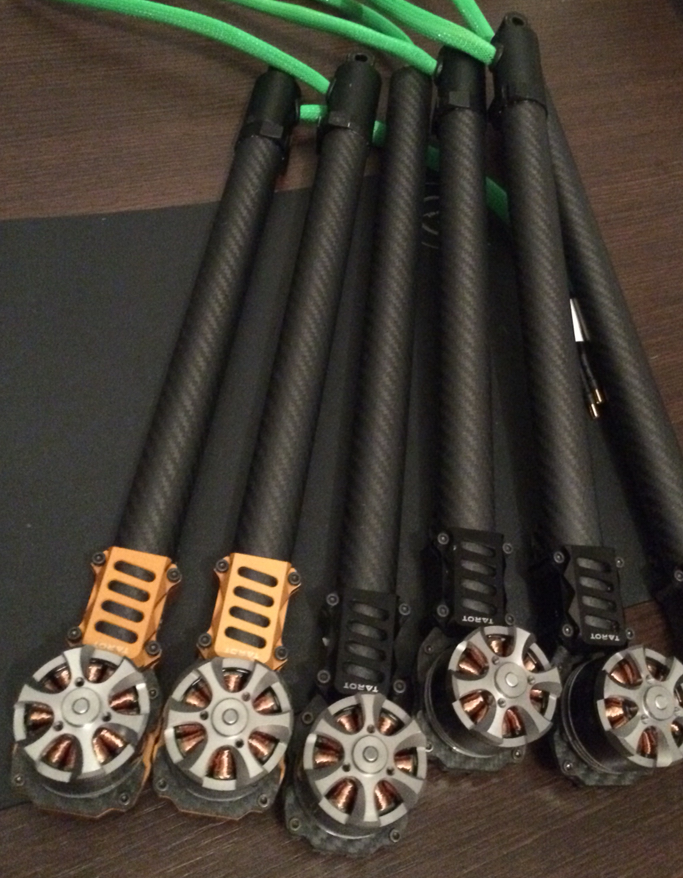
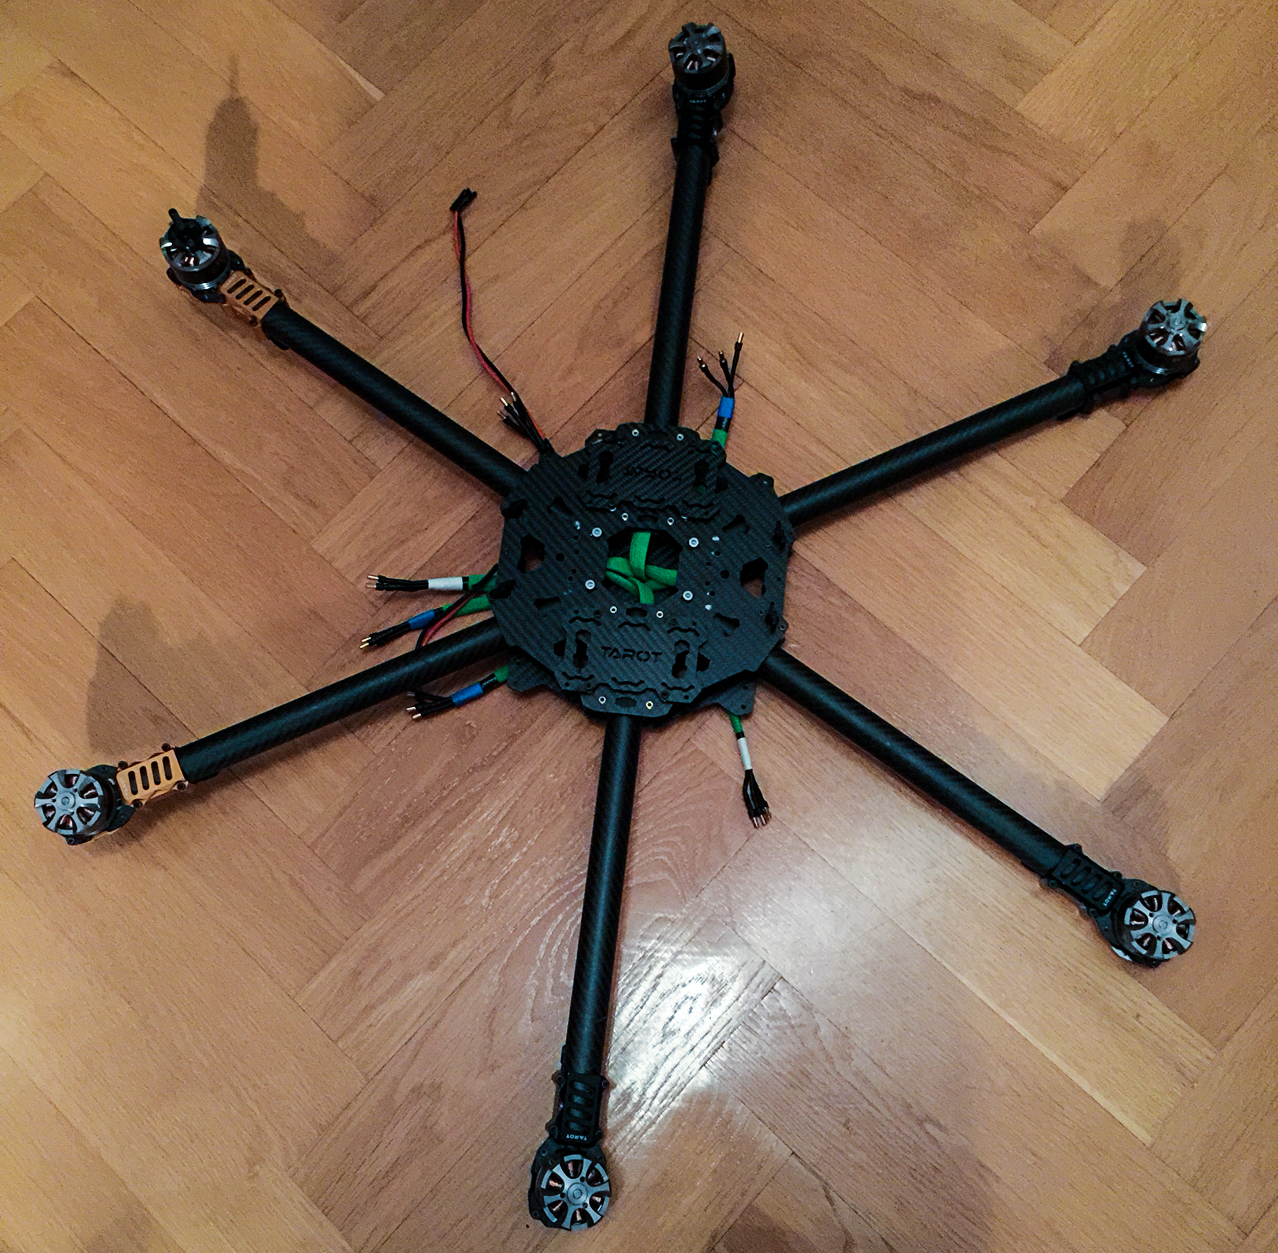
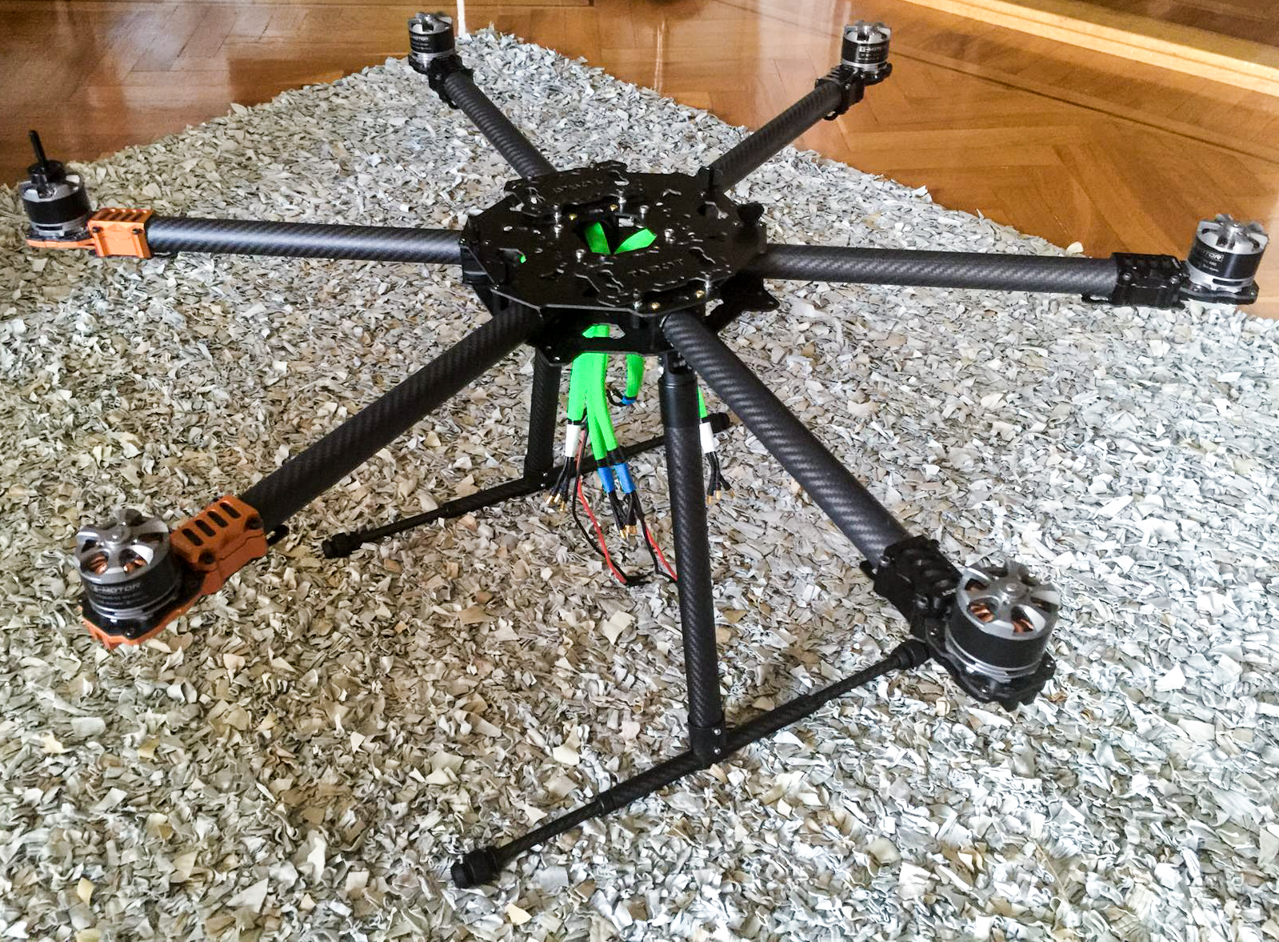
All arms complete
Have now completed all 6 arms, will not have any time to do more before the weekend but hope to have the hexa assembled and start with the electrical parts then.
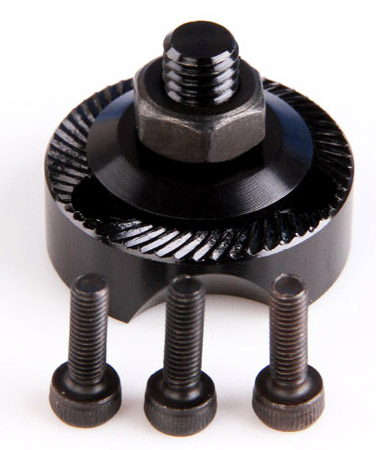
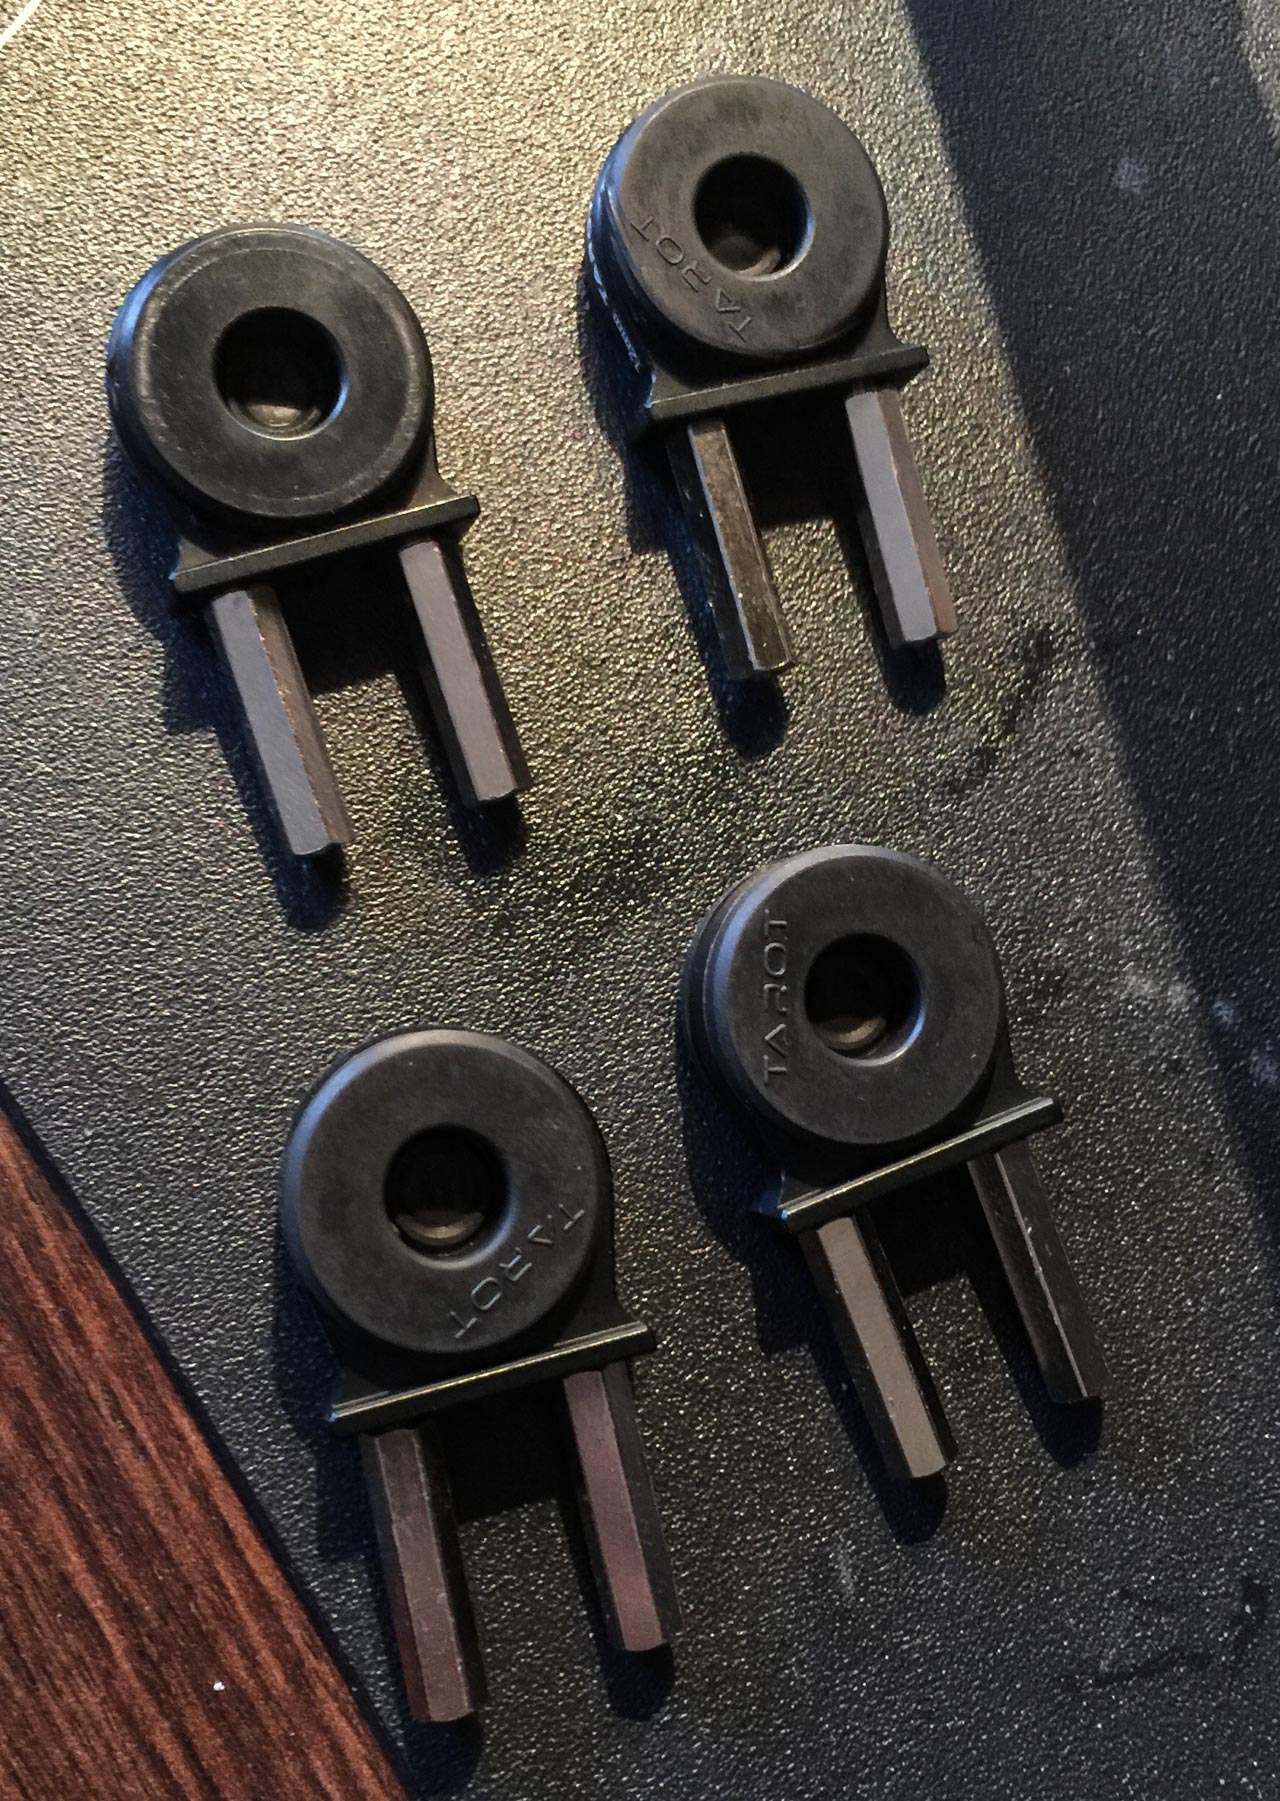
Relized today that the propeller adapters that came with the Tiger MT-3515 motors are to long for the carbon fibre propellers and all were CW so I ordered shorter adapters three CW and three CCW instead.

The frame is finally assembled
ESC Calibration
Calibrated the RC Timer HVSK-40a SimonK ESCs today, have done tests after calibration and I dont seem to get sync issues that others have encountered with Pixhawk, SimonK ESCs and low kv motors.More parts ordered and some testing
Realize that I need some more parts, ordered a XT90 to Banana Plug Charge Lead Adapter so I can chage my Multistar High Capacity Lipo and Hobbyking 3-Channel FPV Video Switcher so I can switch vidoe between my Fatshark FPV camera and the GoPro. Have also connected the LED Lily Pads, used a FOXTECH heavy duty 3A step-down regulator to get 12v from my 6S battery and connected the LEDs via Turnigy Receiver Controlled Switch so I can turn the LEDs On/Off via the radio.
New propeller adapters have arrived
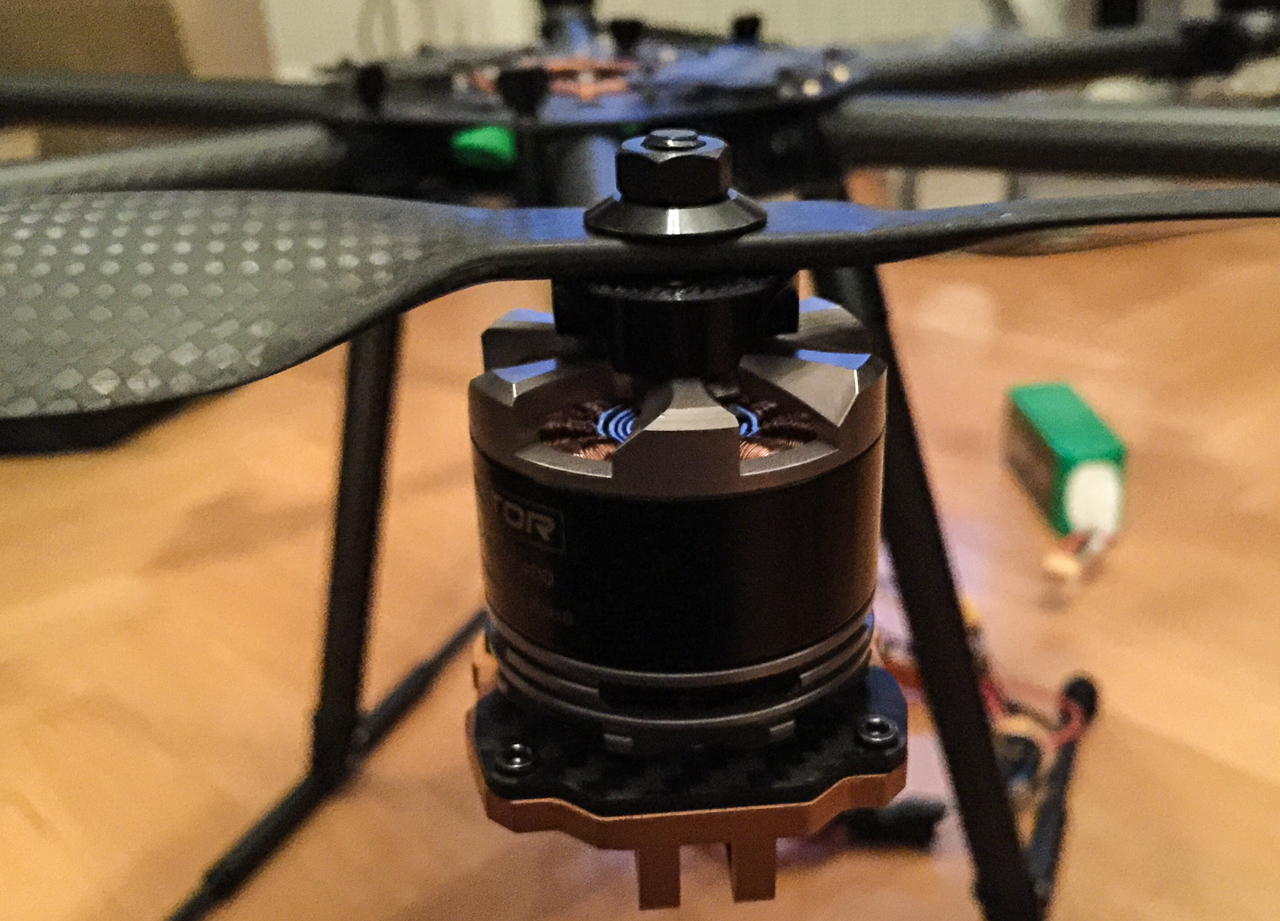
The shorter propeller adapters have arrived and now the CF propellers fit much better
Still waiting for the the video switch some cables to be ablr to connect the minimOSD, 3DR radios, FPV camera and Fatshark transmitter.
New Gimbal
My plan is to use a camera like Sony NEX5 or Canon EOS-M to film with so I've been looking around to find a suitable gimbal, have found a couple that I want but they are quite expensive so I've ordered a Rctimer Black ASP 3 Axis Nex-GH5 Brushless Gimbal to start with.

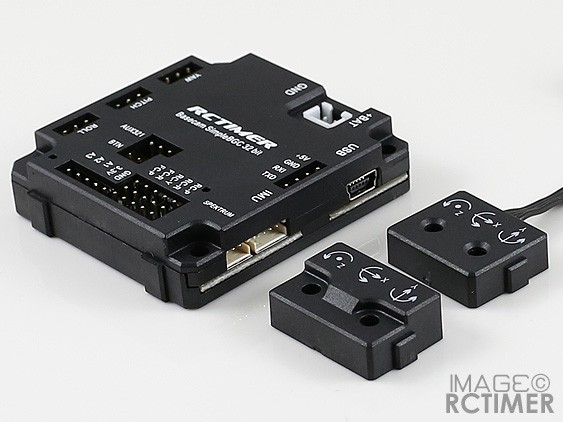
I've also ordered a AlexMos SimpleBGC 32-bit Brushless Gimbal Controller, I been using a Alexmos 8-bit controlelr on my previous gimbal and it worked ok after a lot of tuning, looking forward to test the Autotune function in the new controller.
Hopefully this will work well enough to start with but the plan is to buy a better gimbal in the future.
RCTimer ASP 3-axis gimbal assembly
DHL tried to deliver the gimbal about 20 minutes after I left for work, fortunately they could drop it of in a store close to where I live so I could pick it up after work.
It wasn't to difficult to figure out how it should be assembled just need to find out how I should mount the two IMUs, I'll either have to create some kind of custom mount for it or just use some 3M tape.
Hopefully I'll have time tomorrow to start with configuration, a new firmware has been released for the Alexmos 32-bit card today, the PID auto tuning is supposed to work even better now so I'm looking forward to test it.
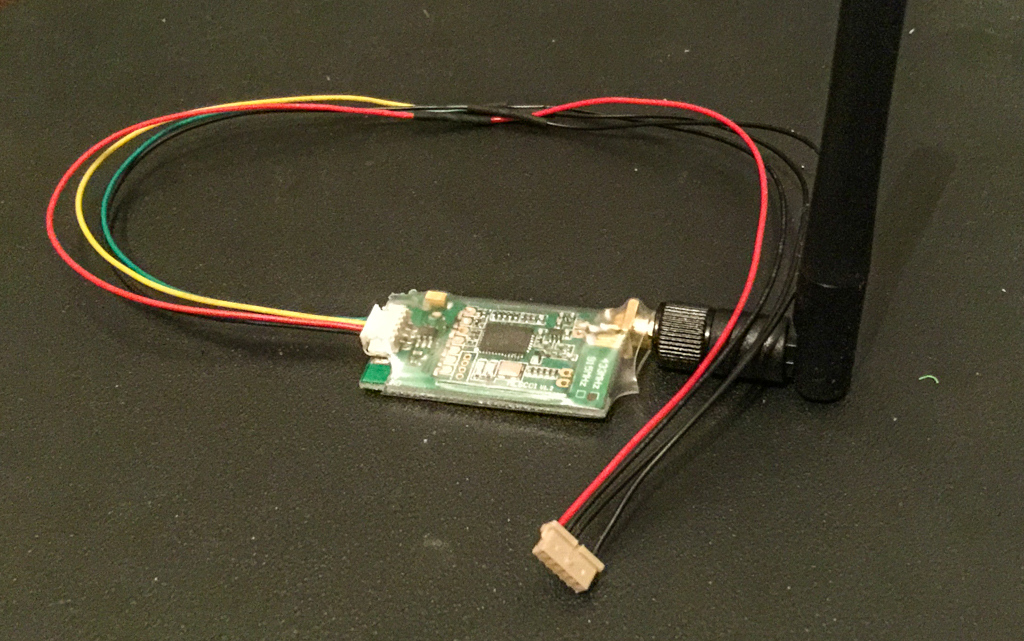
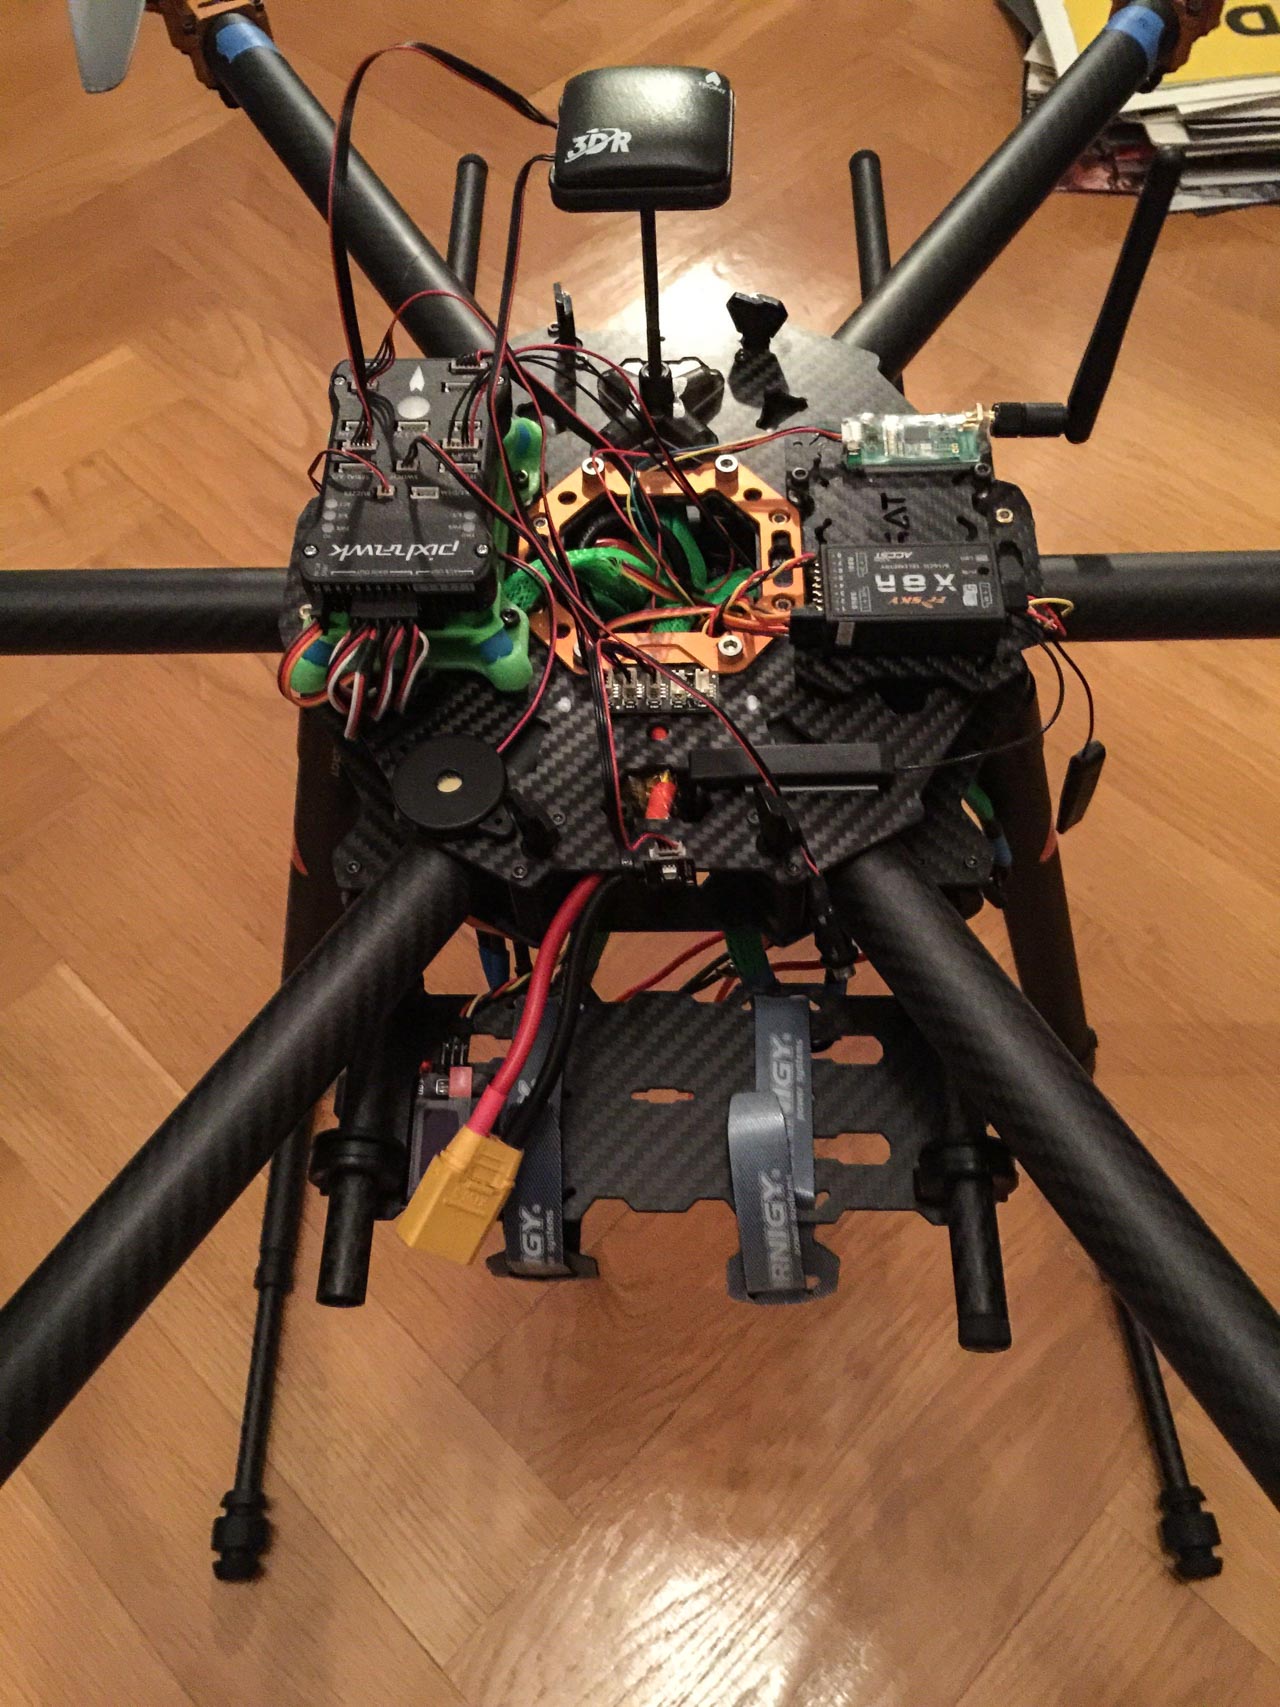
3DR Radio Telemetry Kit
I bought a 433 MHz 3DR Radio Telemetry Kit from Ready to Fly Quads a while ago so I could connect the Pixhawk to my PC and configure/monitor it remotely. When I got it I realized that the cables that were shipped with it didn't fit the Pixhawk ports so I had to buy Pixhawk cables from 3DR to modify the cables that came with the radio.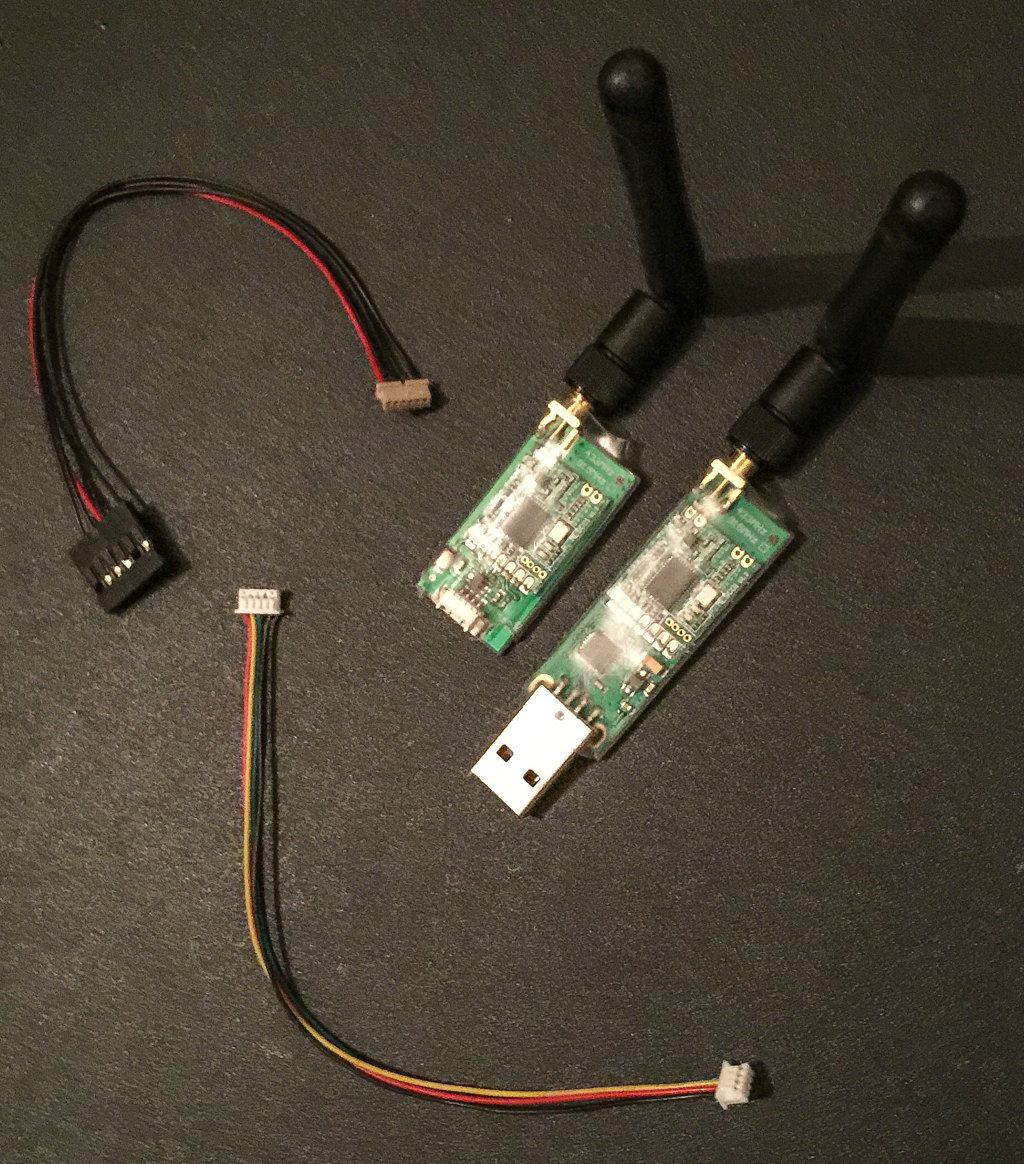
The pinout for the Telemetry ports is documented on the APM Copter page so I soldered the radio cable with the cable from 3DR and connected the radio to my Pixhawk
First test of the new gimbal
I have balanced the RCTimer ASP 3 axis gimbal in all three axes, both IMUs are mounted (I've mounted the frame IMU below Yaw axis), 6 point calibration is done on both IMUs and I have run autotune. Tried first to do autotune on all three axes but it didn't work, it was going on for at least 30 minutes before I stopped it, run autotune on one axis at a time and that worked out better but I got really high PID on roll axis P was 159 and D 95. When I tested the gimbal I had some shakes on the roll so I lowered the P and D on roll and the I could move the gimbal around without feeling any vibrations so I took it out for a handheld test. The Alexmos 32-bit controller is upgraded with the newest firmware 2.43b6
As you can see in the video the Yaw axis works really bad, there seems to be a play in Yaw so it shakes back and forth. I'll try to change the PID for Yaw and see if that helps, I will probably also test to disconnect the Yaw motor and lock the axis to configure Roll and Pitch properly before I continue to troubleshoot Yaw.
More tests and a new controller ordered
Have been testing a lot of settings on the Alexmos 32-bit the last few days and none seem to work for me, the problem could be that it's to cold outside right now. When I test the gimbal inside it seems to work but as soon as I test it outside I have a lot of shakes, mostly on YAW. I got a tip today that I should let it sit outside for a couple of minutes before powering it on to adapt to the outside temperature, I'll do that on my next test and I'll also try to disable YAW completely and check if it's only on YAW I have the vibrations.
The problem right now is that it's getting dark in Sweden quite early and it's dark outside when I'm back from work so the testing goes really slowly. Besides continuing to struggling with the Alexmos card I've found another controller yesterday that I want to test, it's the STorM32, have been reading a little bit on the developers homepage and decided to order one yesterday. Hopefully I'm ready with Alexmos configuration when the STorM32 arrives so I can compare the RCTimer ASP 3-axis gimbal with Alexmos 32 and STorM32.
2nd gimbal test, works better
Have been working more on the PIDs and they worked pretty OK at home, have been suspecting that the temperature diffrence between inside and outside (about 15 degrees Celsius) could affect my results and I got some tips to put the gimbal outside for a while before powering it. The new PIDs and a 10 minutes cool down gave a better result.
Power module and radio modification
The 10 awg cables arrived today so I modified my power module
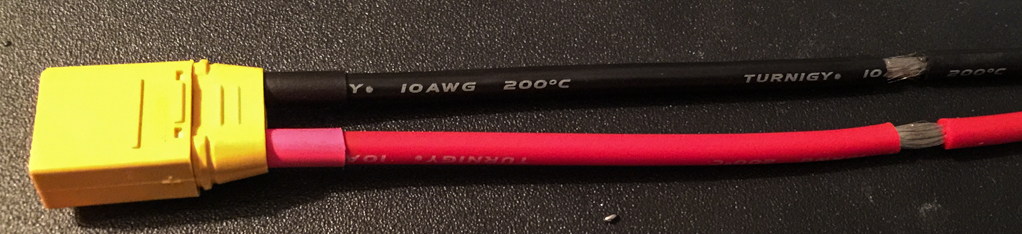
The power module is rated for 90a and I have heard rumors that the current draw sensor has failed on these so I will bypapass it by soldering both input and output on the same side, this will give me 5v for the Pixhawk and I won't have to worry about loosing power completely if the module fails, I will connect a redundant power source to the Pixhawk via a BEC module.

The second thing I had time to do today was to replace one of the pots with a 6 position switch.
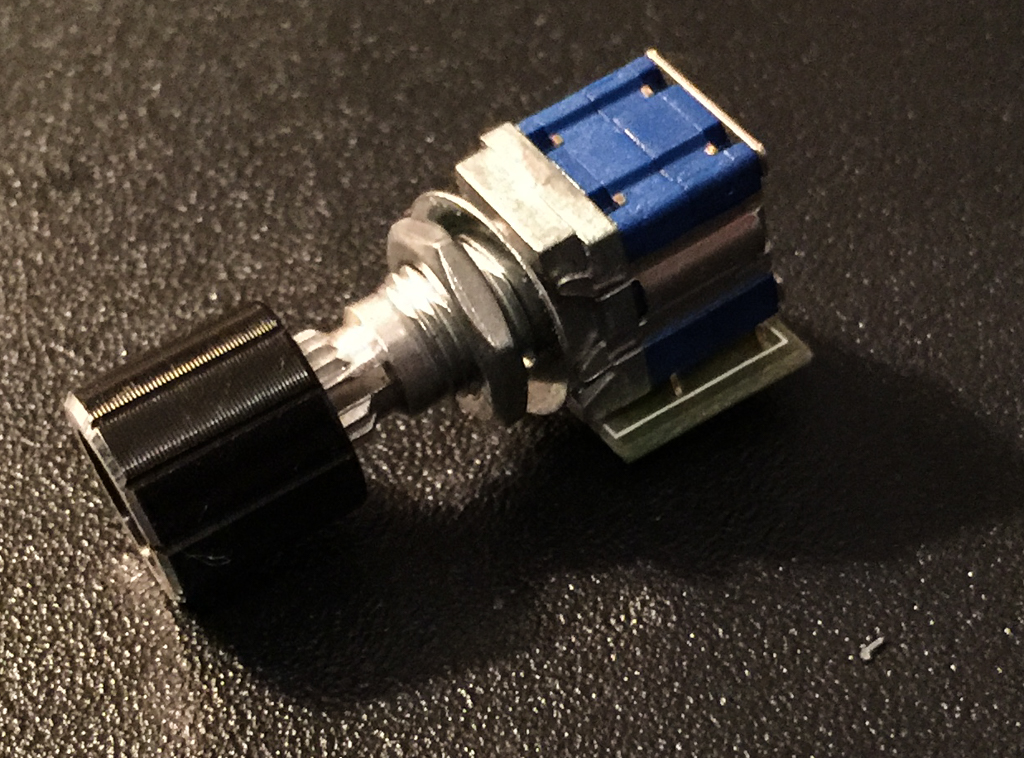
The switsh was really easy to mount, unscrew 6 screws, desolder the S1 pot and solder the 6 position switch.
Power Distribution Module
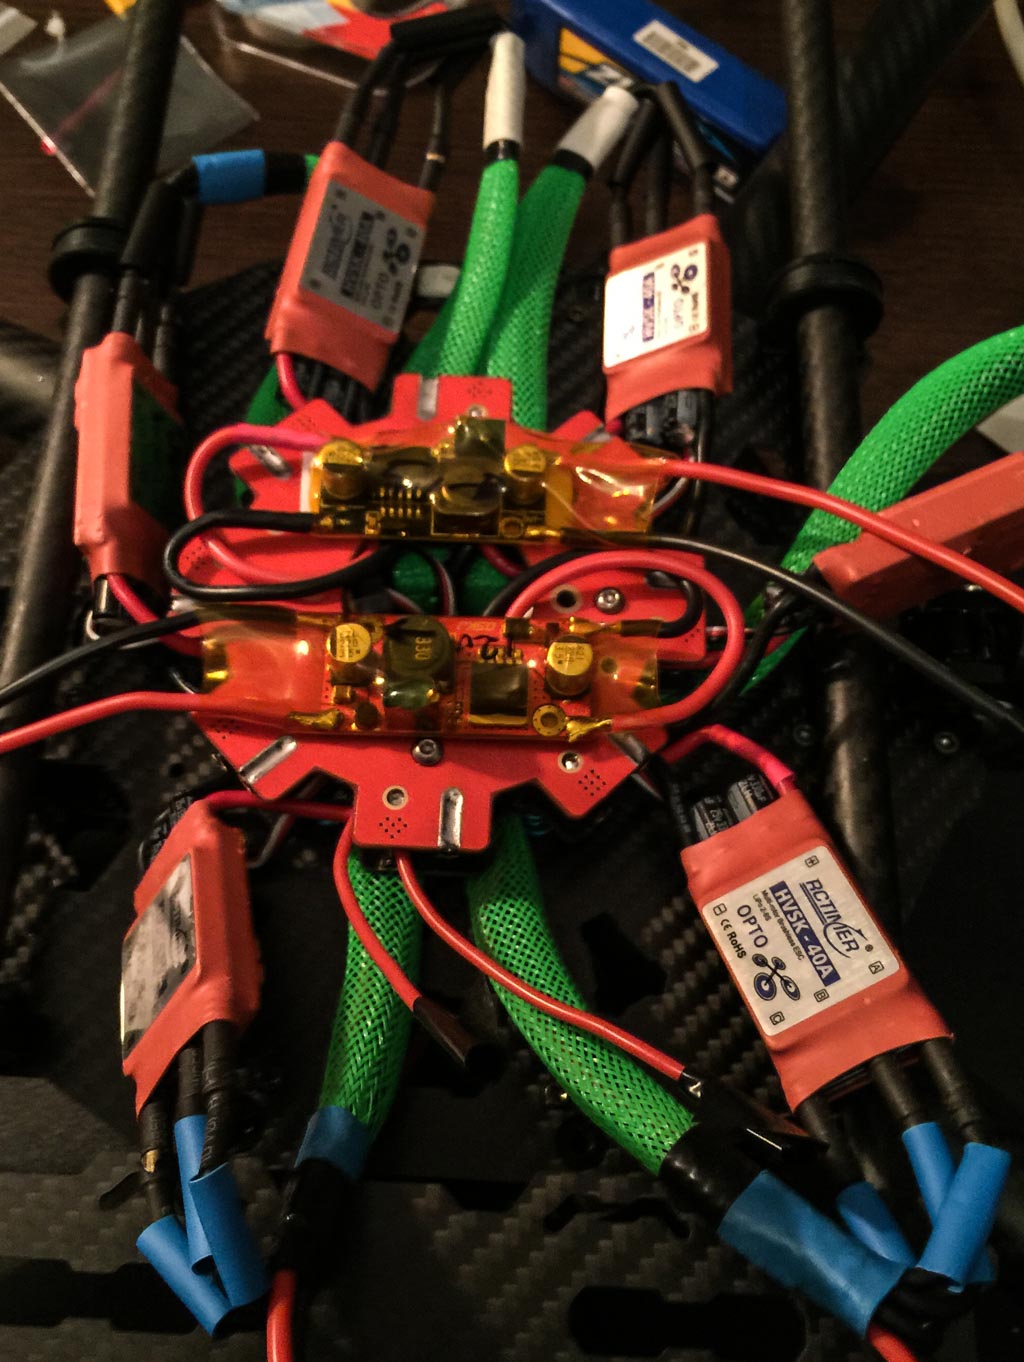
Started to mount the power distribution module, fortunately the holes in it fit the holes in the Tarot T810 bottom plate.
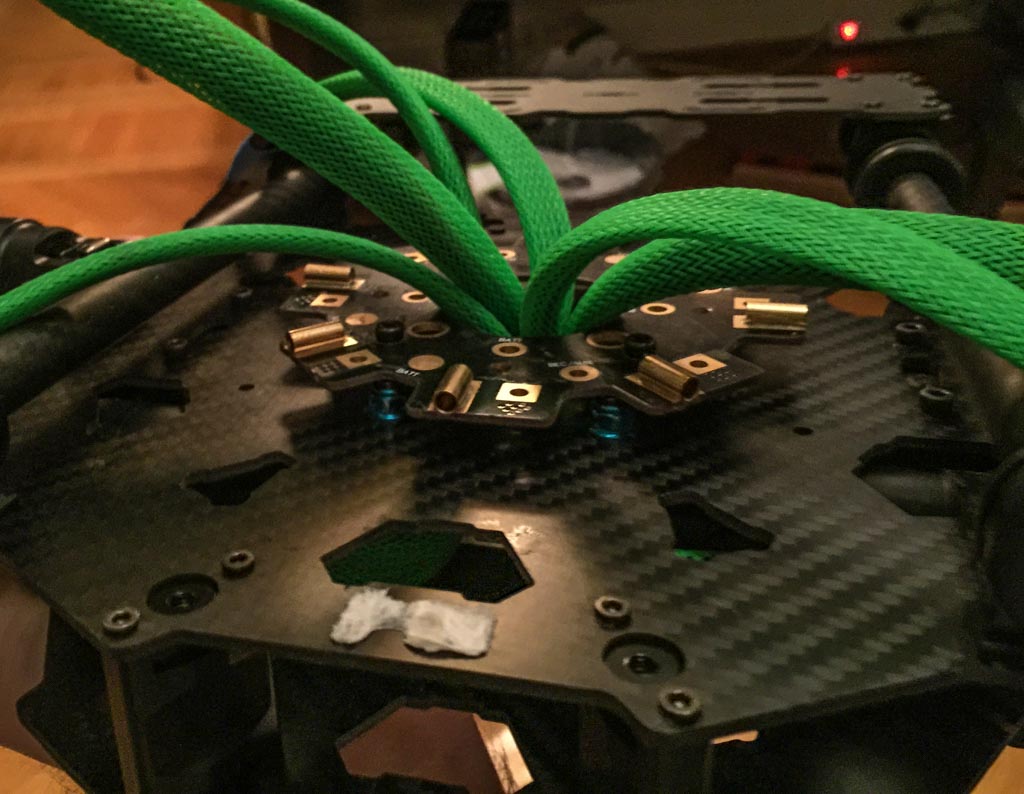
I have to buy a second step down module tomorrow so I'll have a 12v and a 5v source and then I can solder all cables to the PDM.
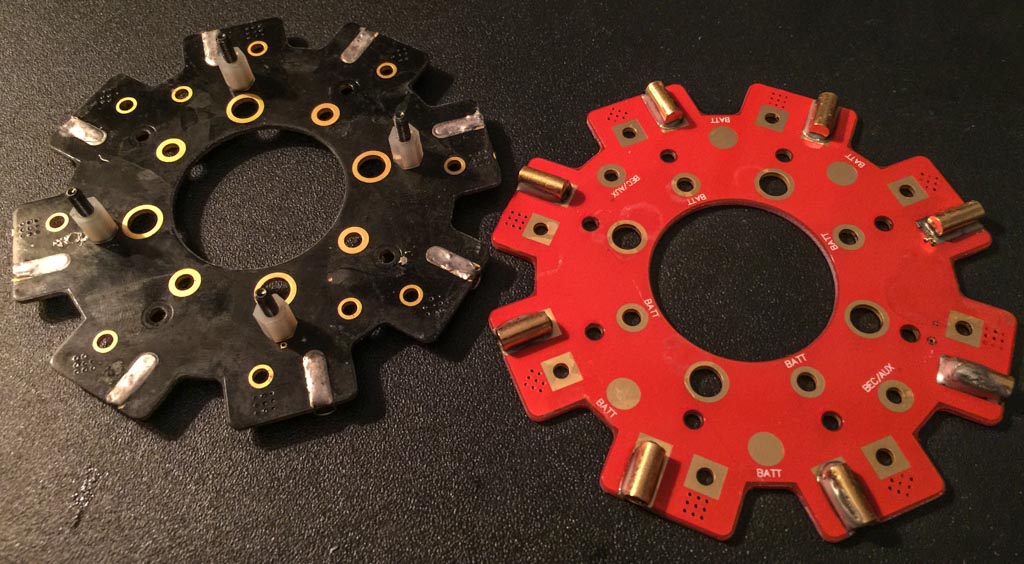
I think that Gryphon are the original and they look really nice but I bought a DYS PDM instead since they are like one fifth of the price.
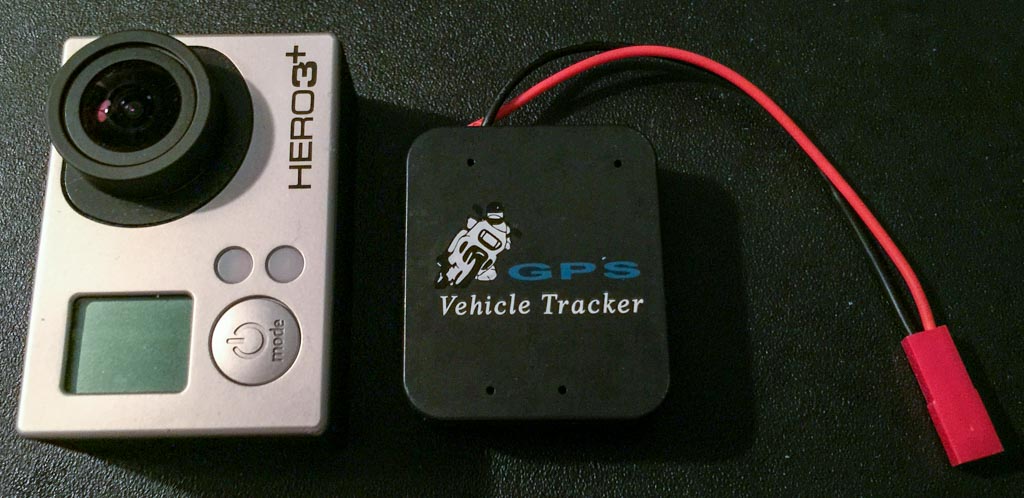
I've also received some new parts, a GPS tracker for the hexacopter and the Storm32 gimbal controller. Really curious about how the Storm32 controller will perform compared to Alexmos but I won't be able to do a real test before the hexacopter is flying so I need to speed up the build now.
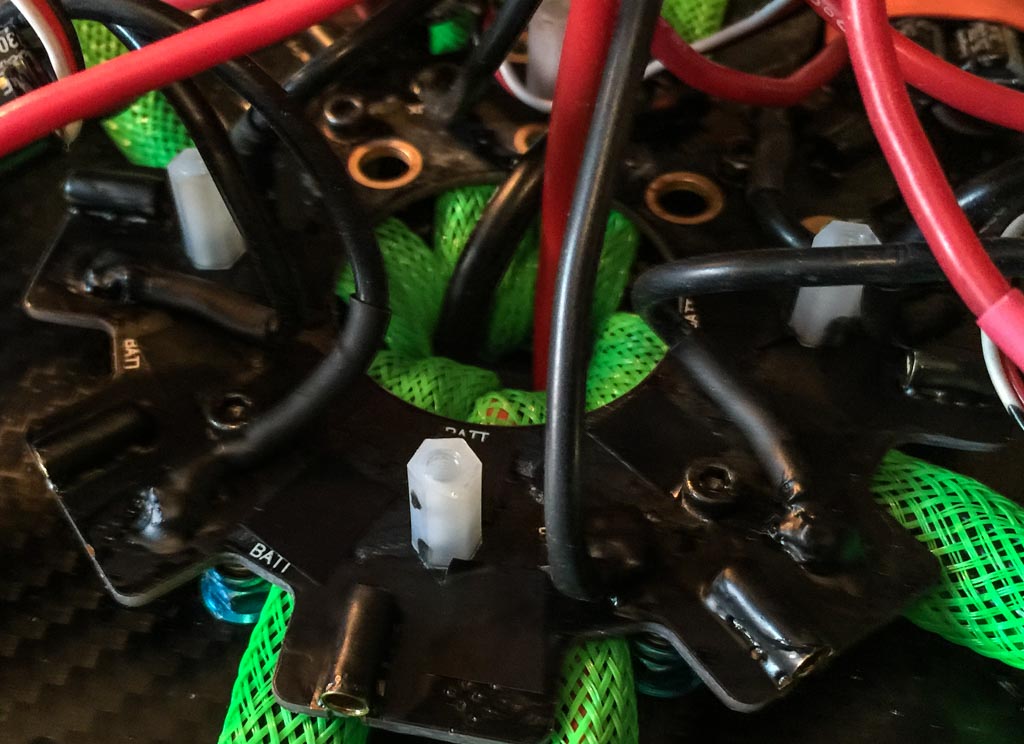
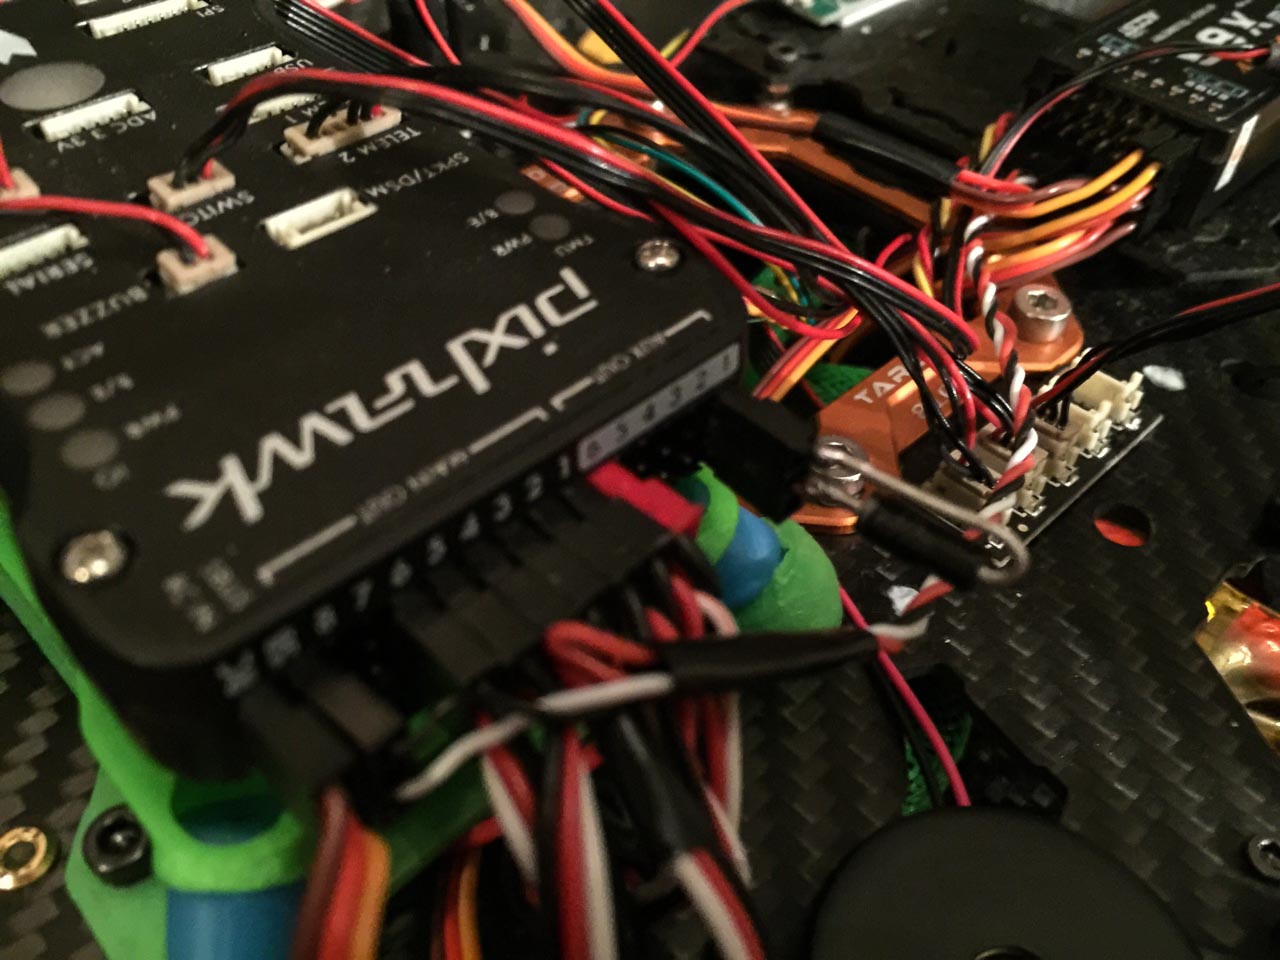
Power Distribution Module soldered
I have finally soldered all ESCs, step down modules and power cables to the Power Distribution Board, there are a lot of cables
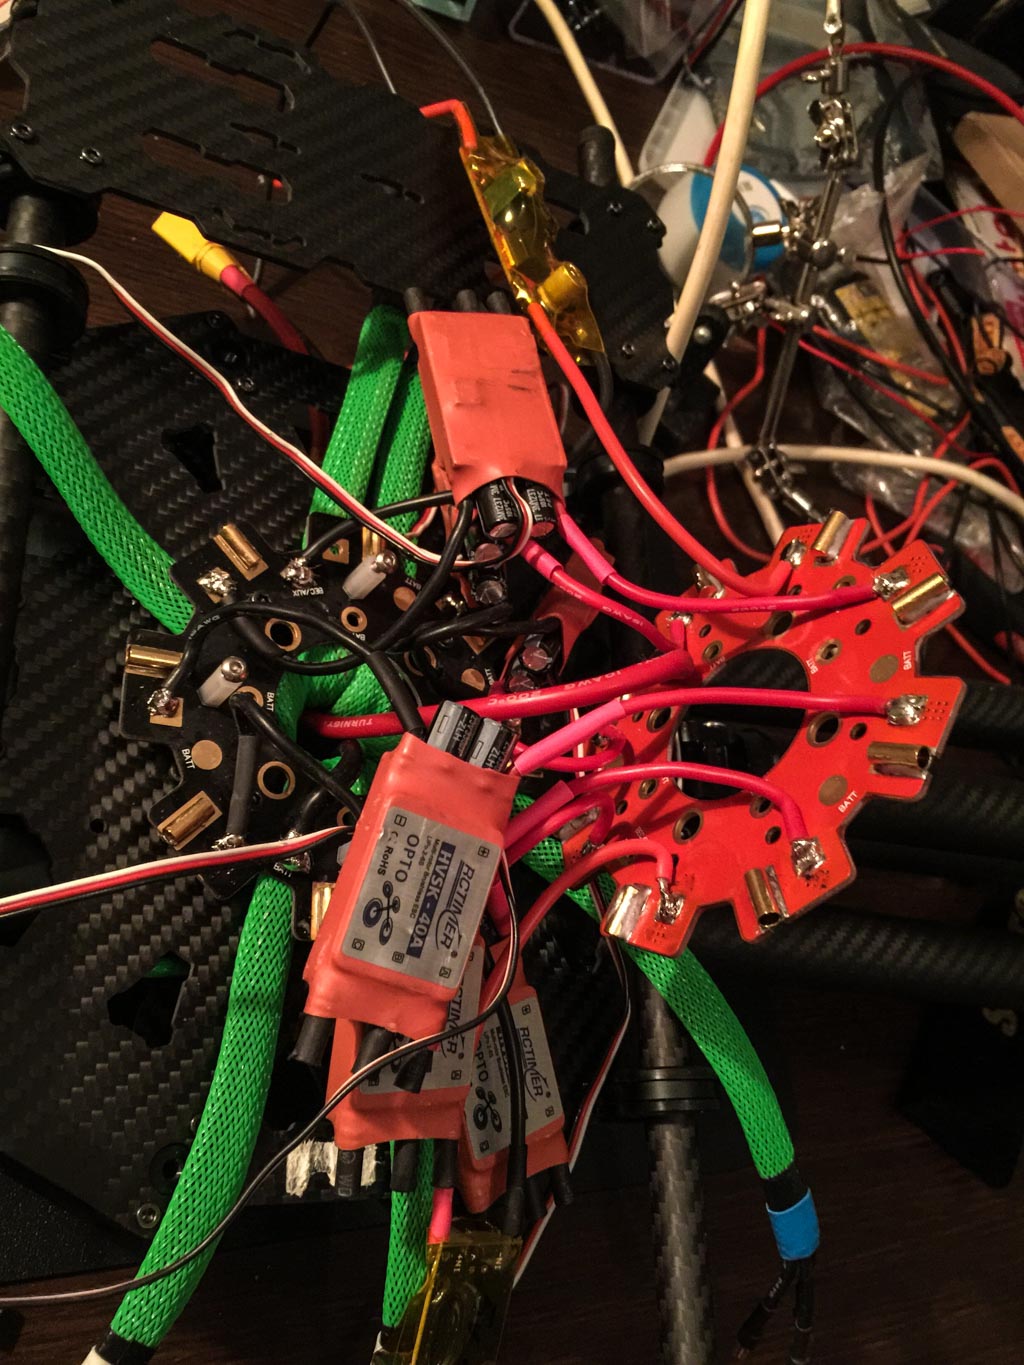
Tested a layout for the ESCs and step down modules, they will fit quite OK under the bottom plate, now I just need to measure everything so there isn't any shortage, mark the signal cables from the ESCs and I'll also use liquid electrical tape on all solderings. After that I can finally start to program the Pixhawk, balance motors and propellers, connect and test OSD.... Well it's still a lot to do.
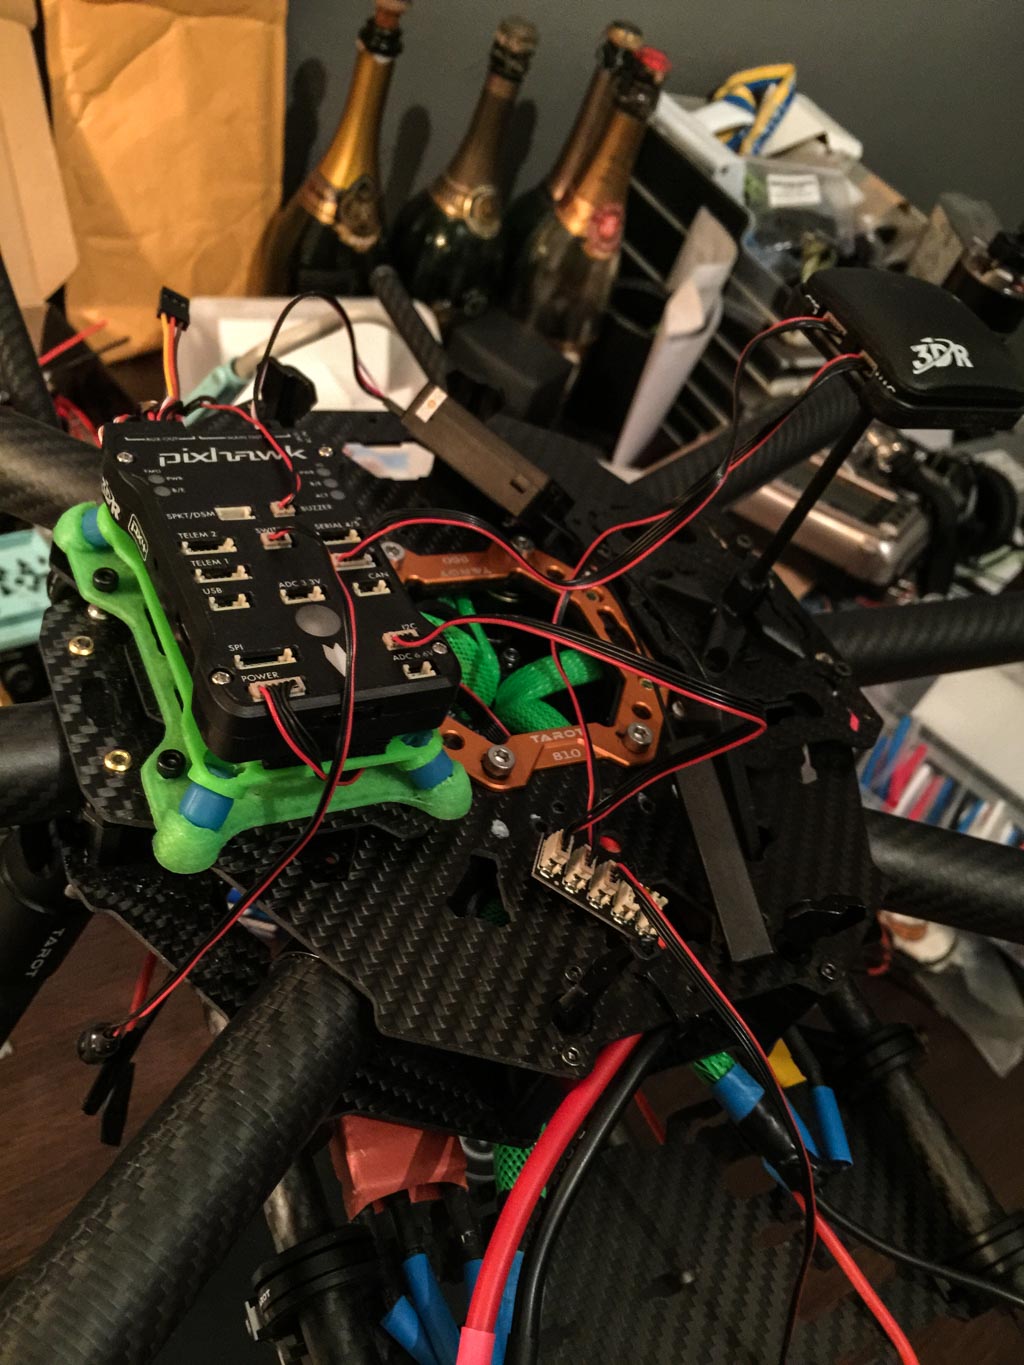
Pixhawk finally mounted
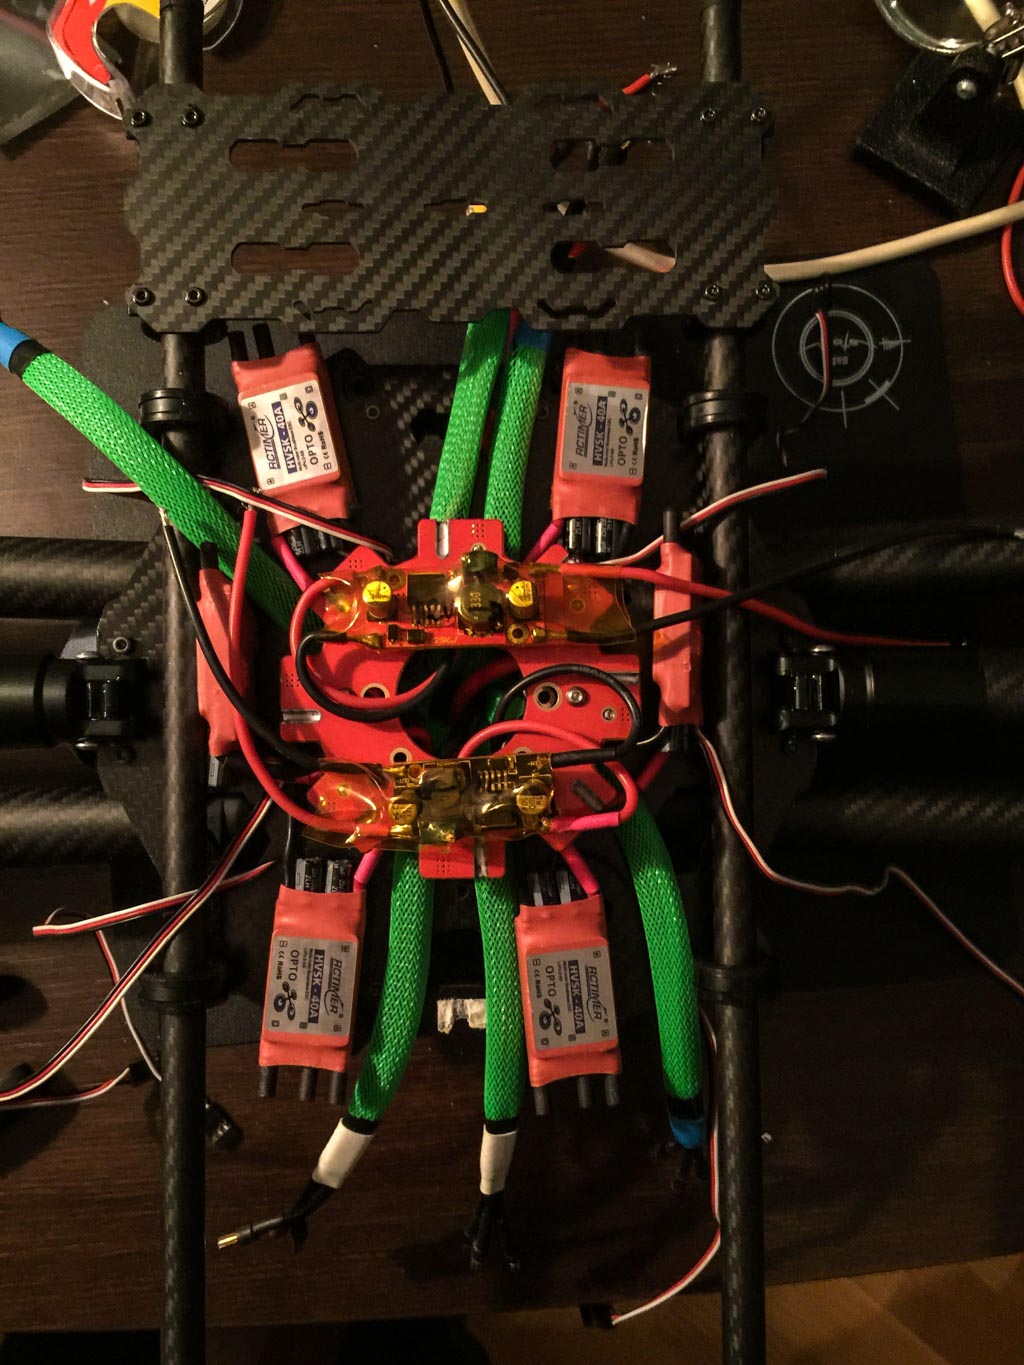
I have painted all soldered cables with Liquid Tape and covered all unused solder points with electrical tape, don't want to risk any shortages in the power distribution module.
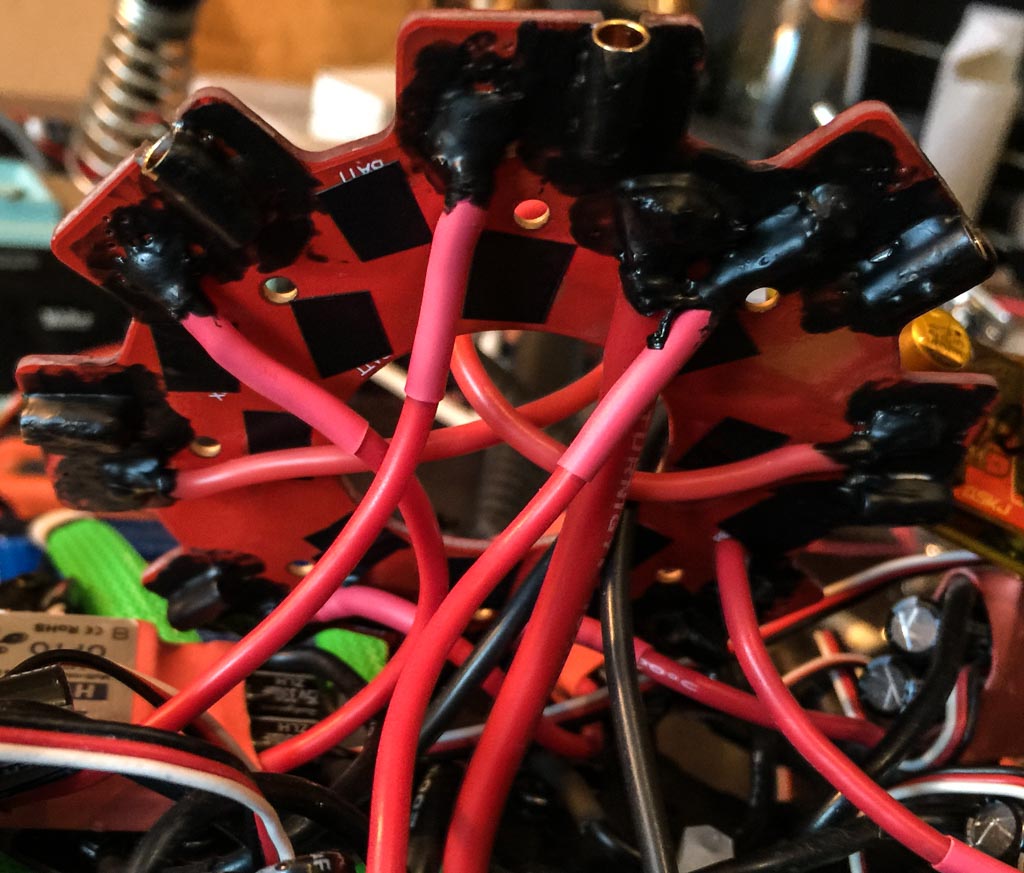
The power distribution module is ready and all motor cables are connected to ESCs, I will cover the bullet connectors with shrink tube when I have tested that the motors are rotating in the right direction.
I have now mounted the Pixhawk on a anti vibration mount that I bought from ReadyMade3D, They are selling a version that is made for the Tarot T810 but they didn't have it when I bought it so I downloaded a bottom plate for Tarot T810 and had it 3D printed by a friend at work. If you have a 3d printer the files can be downloaded here. http://www.thingiverse.com/thing:163472
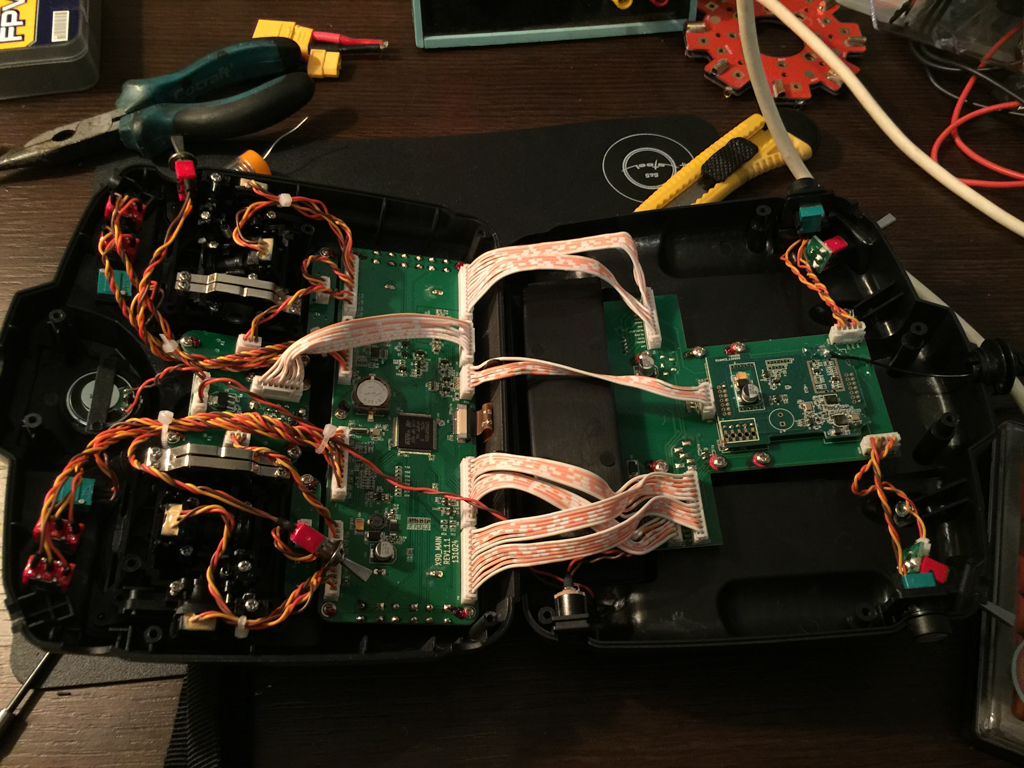
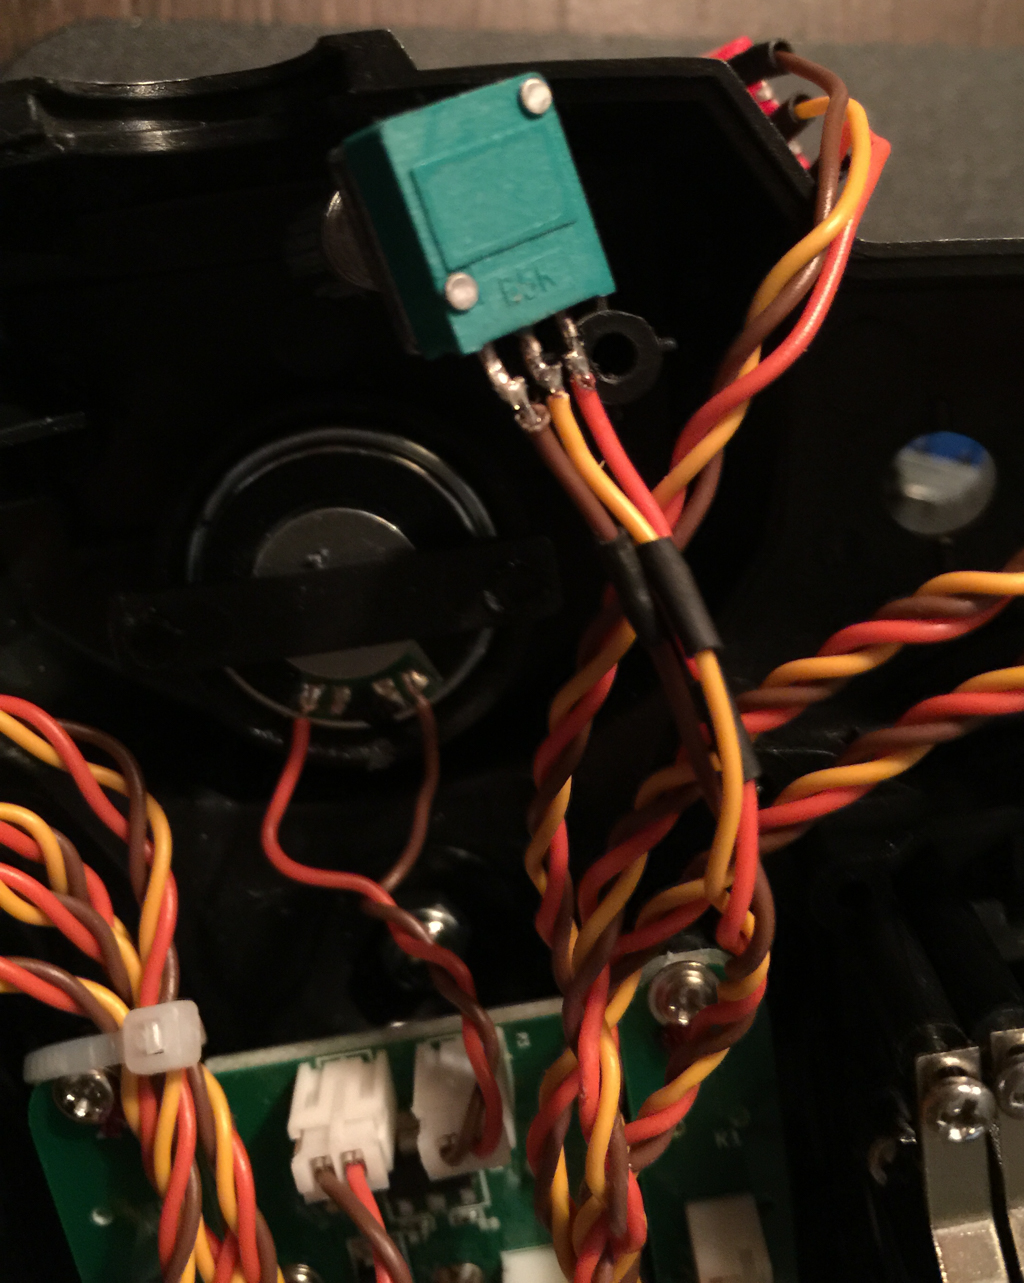
6-position Switch configured
I have now configured the 6-position switch on my Taranis with Pixhawk. The first thing I had to do is to calibrate the 6-position switch, I configured is as Multipos Switch on the hardware page and then calibrated it via the calibration page on Taranis, the problem was that the PWMs on the 6 positions didn't correspond to PWMs needed for the 6 flight modes on the Pixhawk to solve that I created a curve for that channel.
To do that press the menu button, choose the model you want to edit and go to curves page, choose one of the curves and set it as 6pos curve, the values I use are
| 1 | -100 | -100 |
| 2 | -60 | -39 |
| 3 | -20 | -12 |
| 4 | 20 | 11 |
| 5 | 60 | 41 |
| 6 | 100 | 100 |
Then you need to add this curve to che channel you have configured for your 6-position switch, on the curve field you choose Cstm and the curve you have programmed. If these settings are not working with your radio you can just open Mission Planner and go to the flight configuration page then you can tune your curve and see the result directly in Mission Planner.
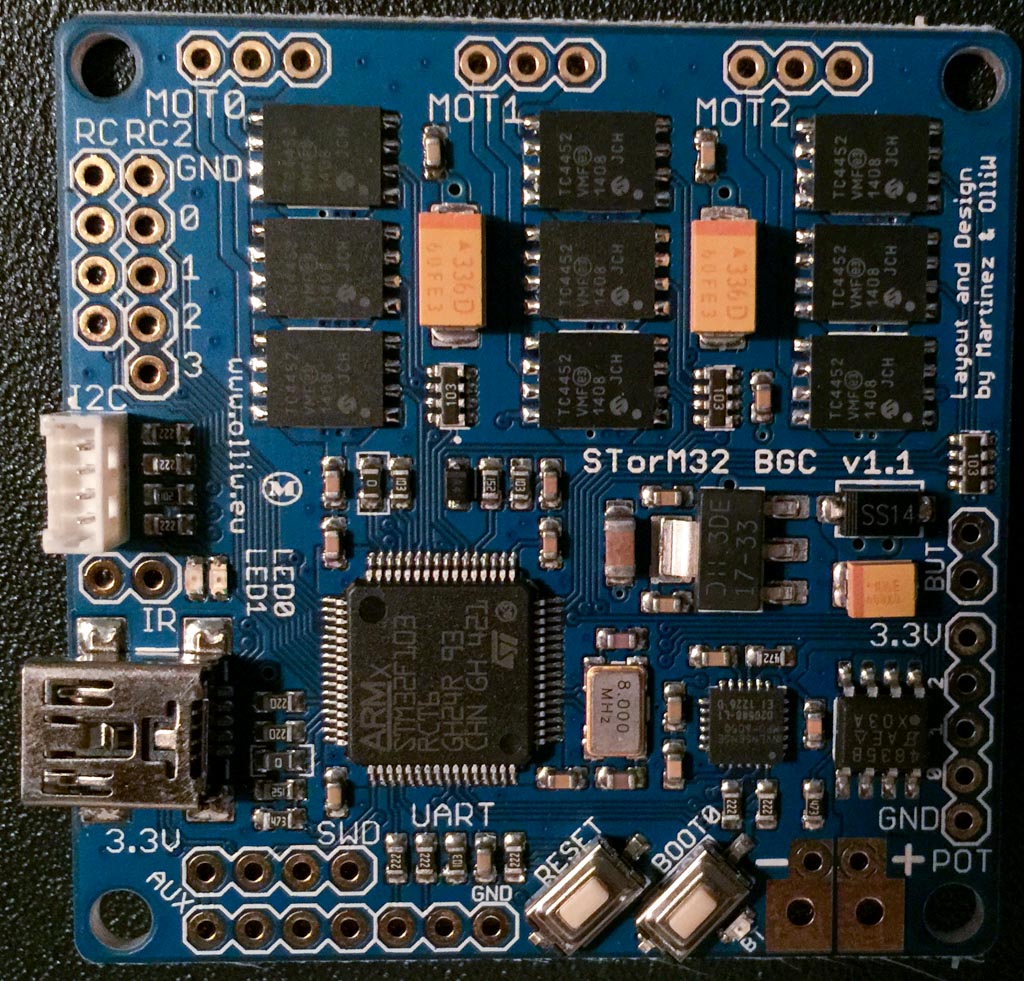
First test with STorM32 BGC
I have replaced the Alexmos 32-bit controller with STorM32 on my RCTimer ASP 3-axis gimbal, only a quick PID tuning has been done, it performs quite good while testing it handheld, really looking forward to test it in the air.
Almost ready to fly
The build has been reeeeeeeeeeeeealy slow :-( To much at work but I have finally been able to work some more on the T810, almost everythin is in place and I've had time to:
- Verify motor direction, had to swap the propeller mounts, mounted CCW on CW motor and vice versa
- Configure radio failsafe
- Configure battery failsafe, I've set it to 22,2v (3,7v per cell)
- Set a Geo Fence 100x100m to start with
- Setup Pixhawk to use Extended Kalman Filter (EKF) algorithm for navigation
- Setup Channel 6 for Rate Roll and Pitch P tuning
It should finally be time for a maiden flight the comming weekend
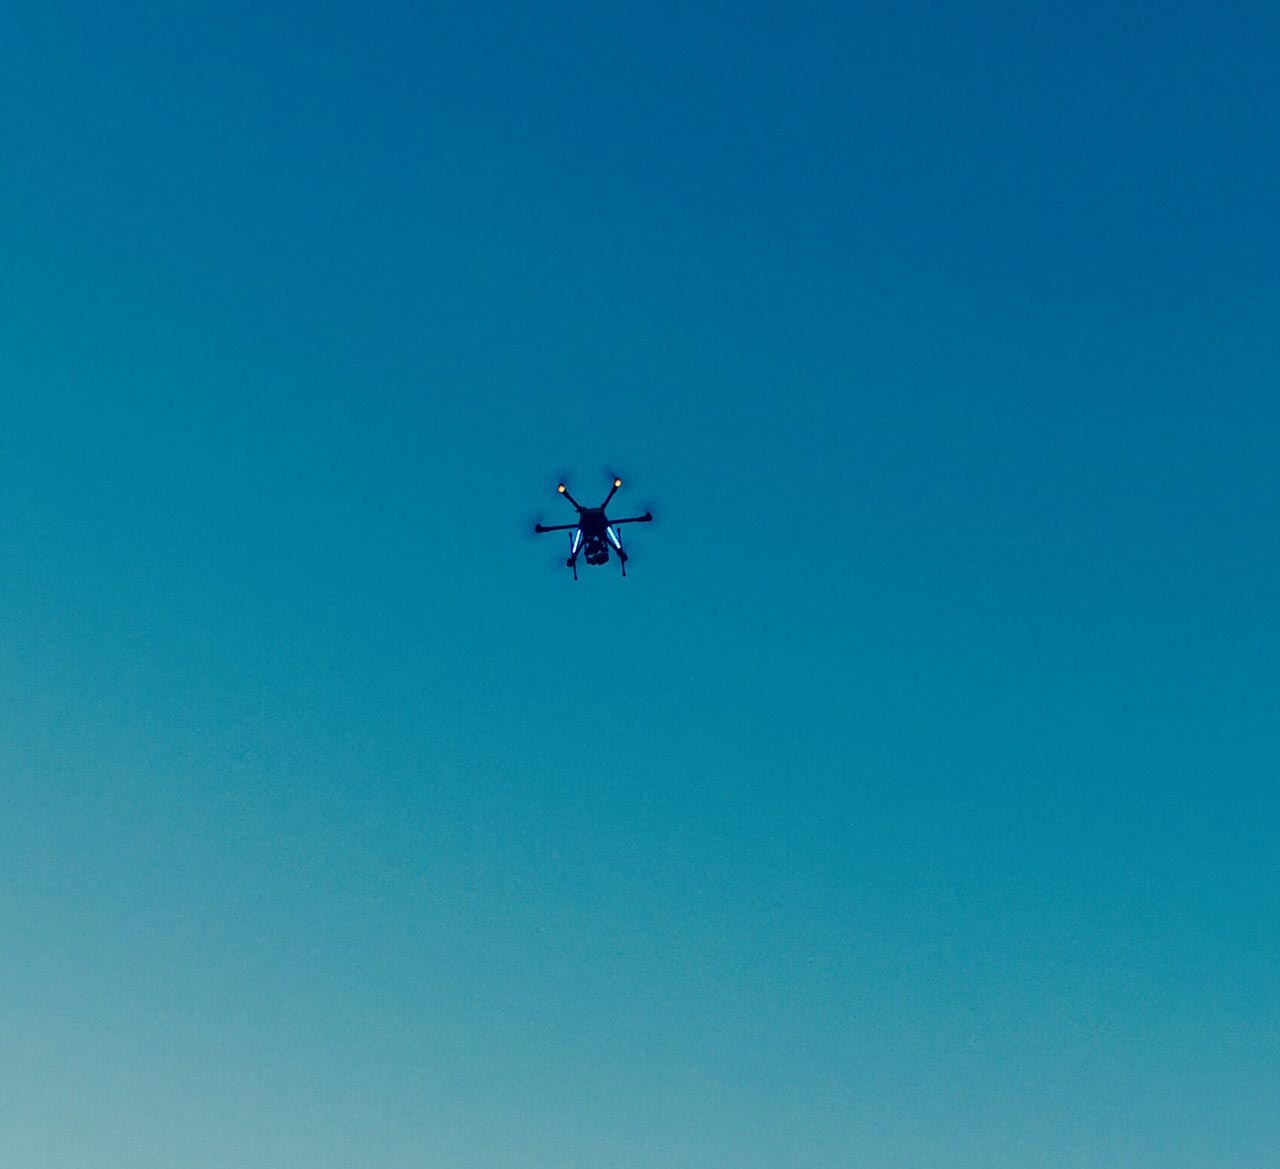
Maiden flight
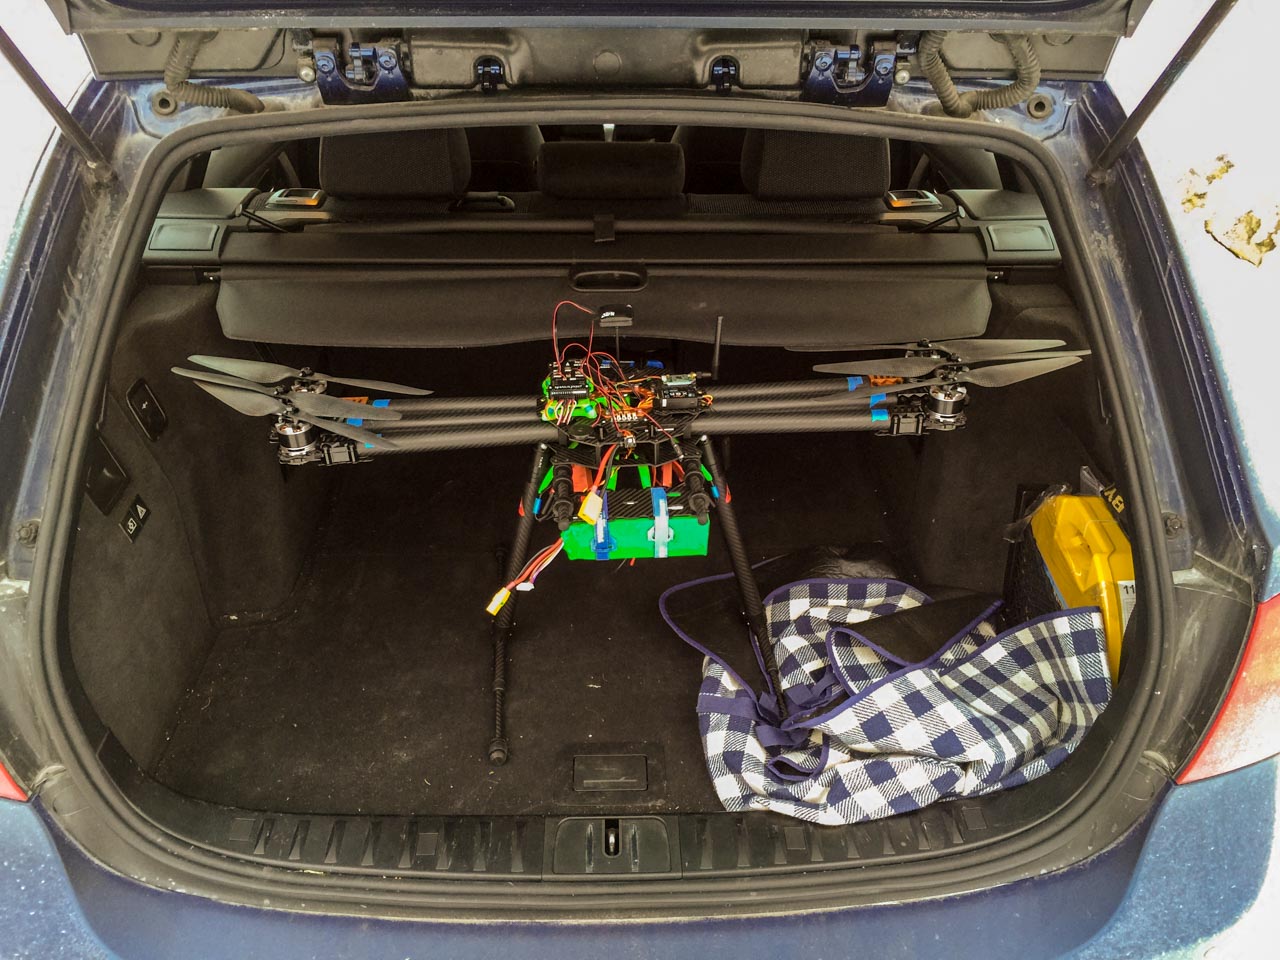
Finally, maiden flight :-) I'm glad I didn't buy a rarger Hexa, would have to buy a larger car...
I checked all propellers so they were mounted correctly but it was still a little bit nervous to fly for the first time, didnt know if it would lift or just flip...
I realized that the pitch channel was reversed so instead of flying forward it was flying backwards so I didn't want to fly to far away.
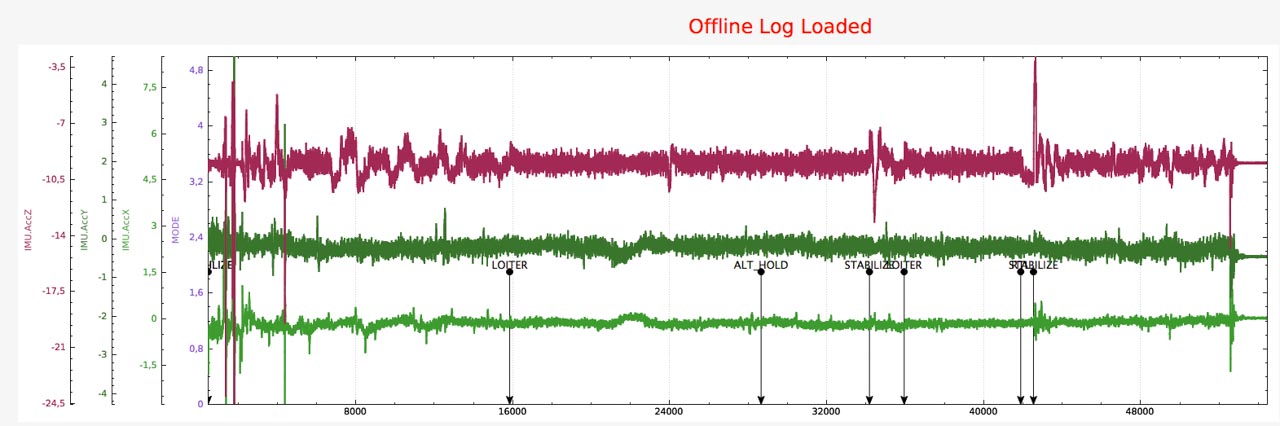
I checked the logs after the flight and it look as the vibration damping works really well. Next step will be to fix the pitch and mount the ESC permanently then I can start tunig it. I have to mount the GPS tracker, FPV camera and video transmitter and start testing my gimbal.
Prepared FPV, OSD and some more.
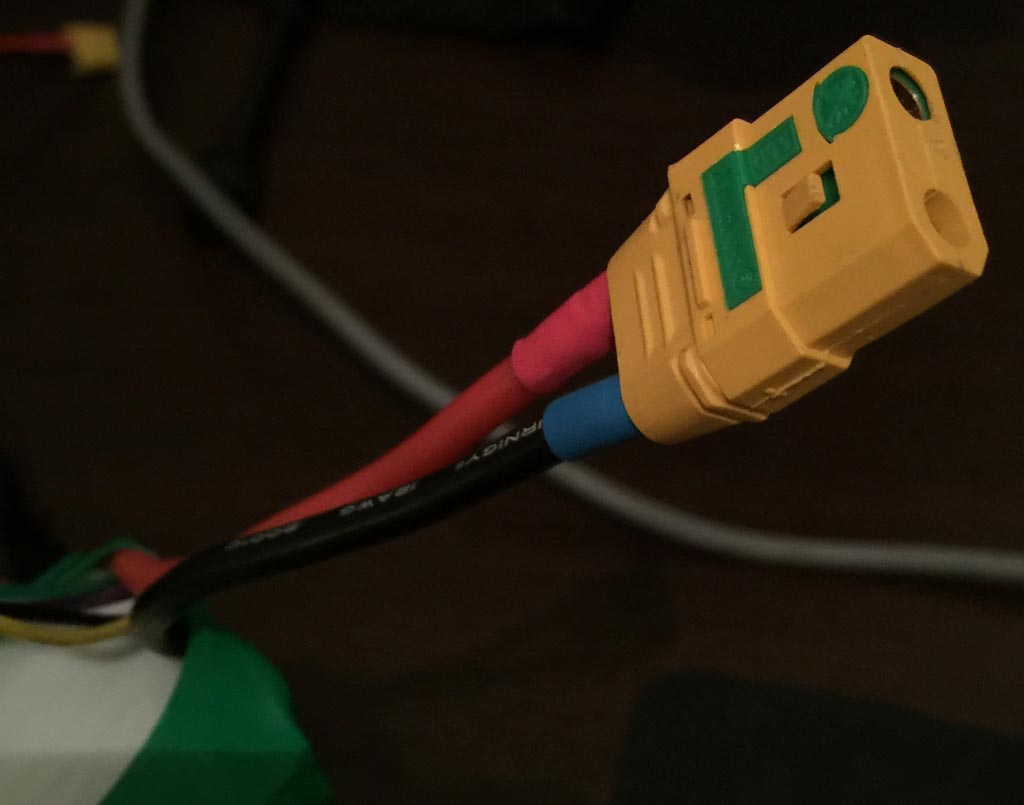
Have had to much at work and also been away skiing for a week so there has not been many updates... Had some spare time today so I managed to do some updates, started with some soldering, replaced the regular XT90 connector on my 2nd Multistar High Capacity 6S battery with a spark free XT90.
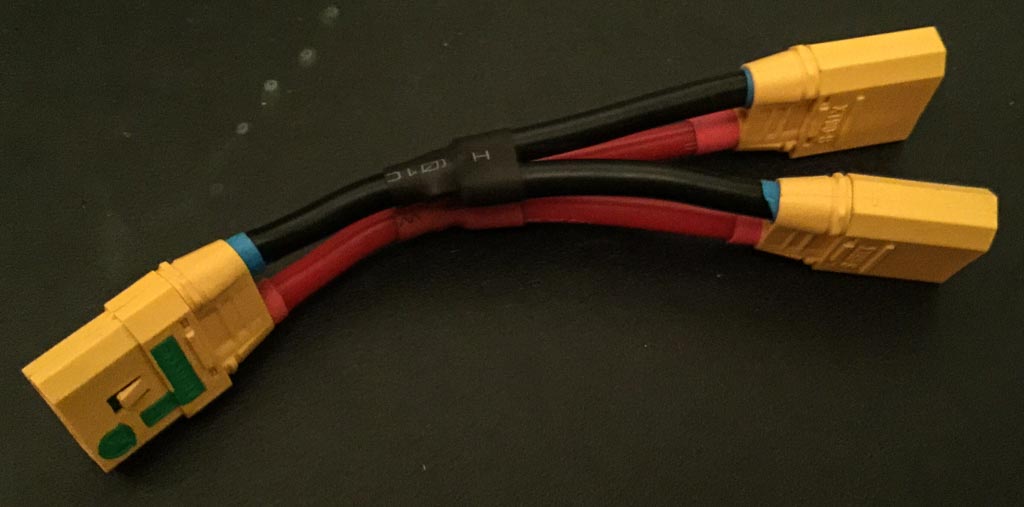
Made an adapter to connect my batteries in parallel
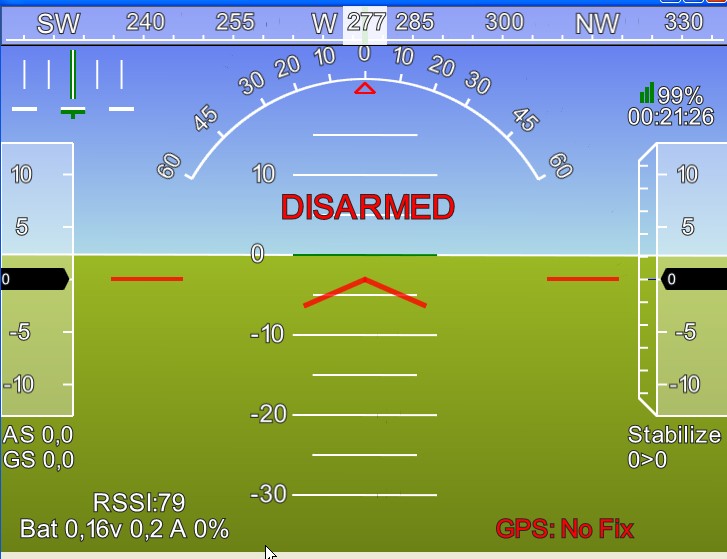
Prepared my OSD, used a MinimOSD that i bought from Ready to fly quads and loaded with MinimOSD-extra 2.4 firmware. Made a new power/video cable for my Fatshark transmitter with a breakout to connect the video signal via the OSD.

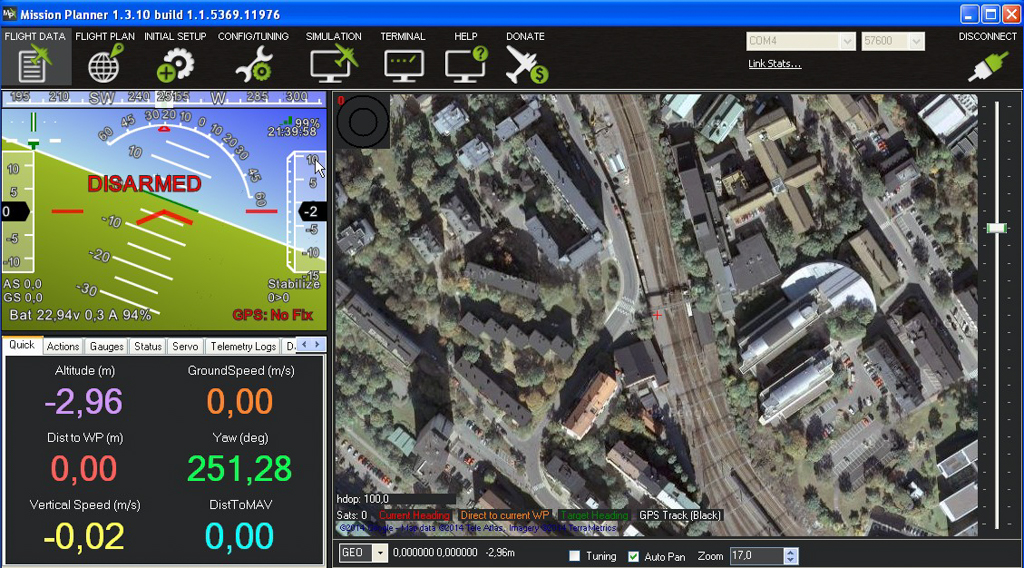
Connected the OSD to Telemetry port 1 on the Pixhawk and it worked directly, decided to try to get RSSI readings from my Frsky X8R TX to Pixhawk/OSD. Connected the RSSI out from TX to SB port on Pixhawk. Configured the RSSI_PIN value to 103 which corresponds to the SB port but when I configured 3.3 volts as the descritions says the value became red.
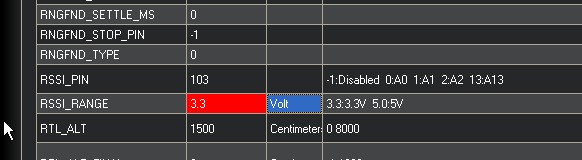
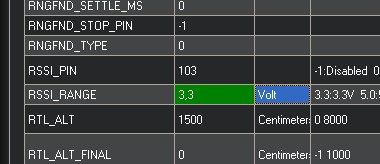
I had to configure 3,3 to get a green value.
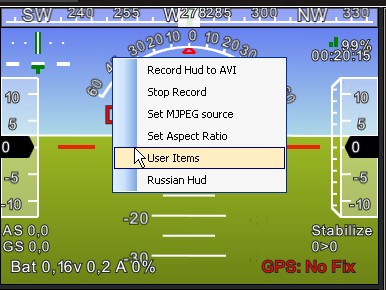
After this I could see the RSSI value on my OSD but not the HUD in Mission Planner, to enable RSSI on the hud rightclick on the HUD and choose "User Items"
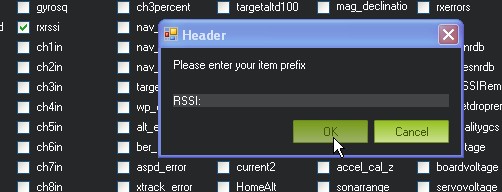
Check the rxrssi box and set your prefix for the value
After this you will see the RSSI value on your HUD
Now I need to get an Android TAB so I can connect to Pixhawk when flying and also a FPV monitor.
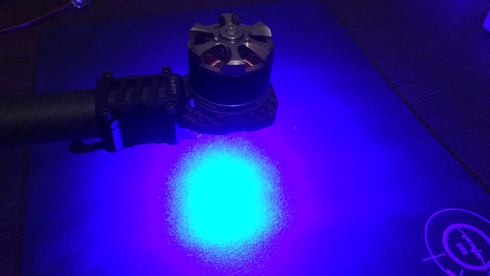
Added LEDs for better orientation
I find it hard sometimes to see which way the hexacopter is facing, no problem if I fly with FPV camera and a screen showing so I can see what the hexa is filming but without that it can be a problem if the hexa is far away.
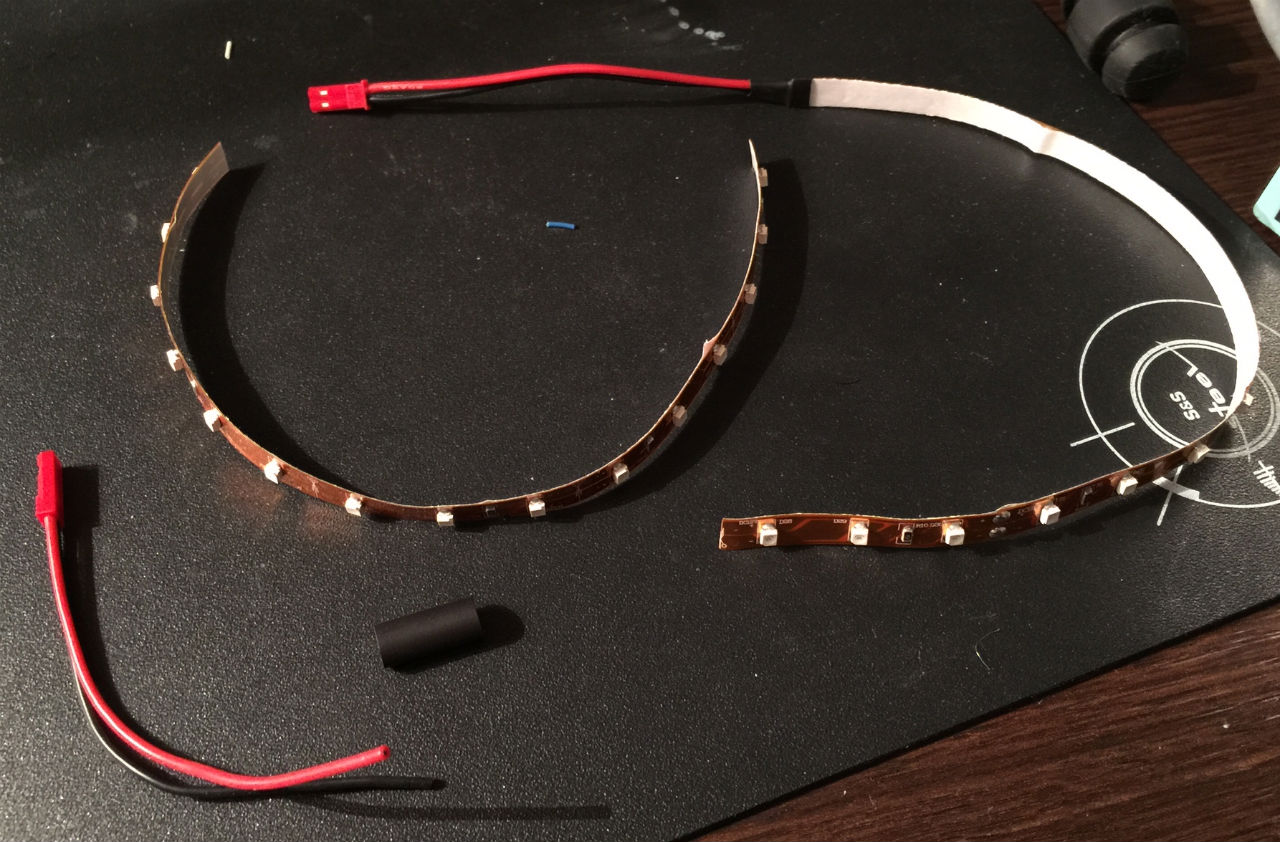
I bought a 12v LED lightning strip from Ready to fly quads cut two pices that will fit the legs on the hexa and soldered JST pig tails to them.
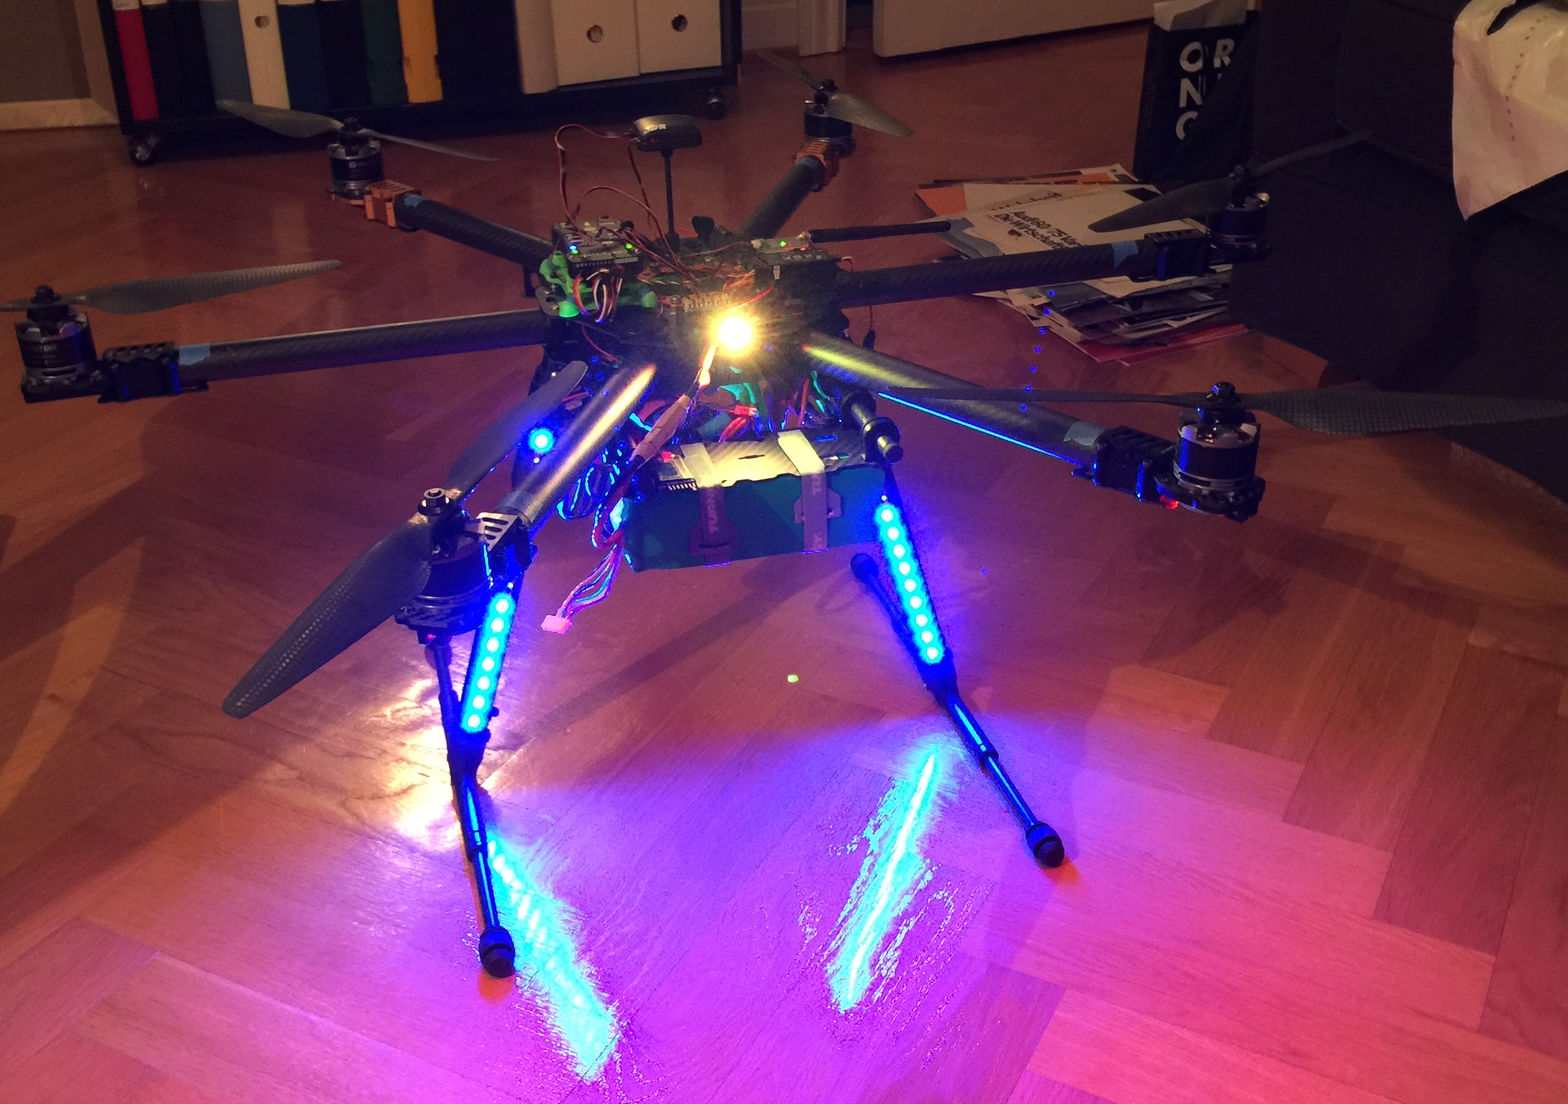

It should now be much easier to see which way the hexa is facing, red LEDs are probably more visable if the hexa is high up in the sky so I have red LED plates under the motors but I wanted blue LEDs on the legs since I like the color better... The LEDs are connected to a RC switch so I can turn them on/off from the radio.
Added a zener diode
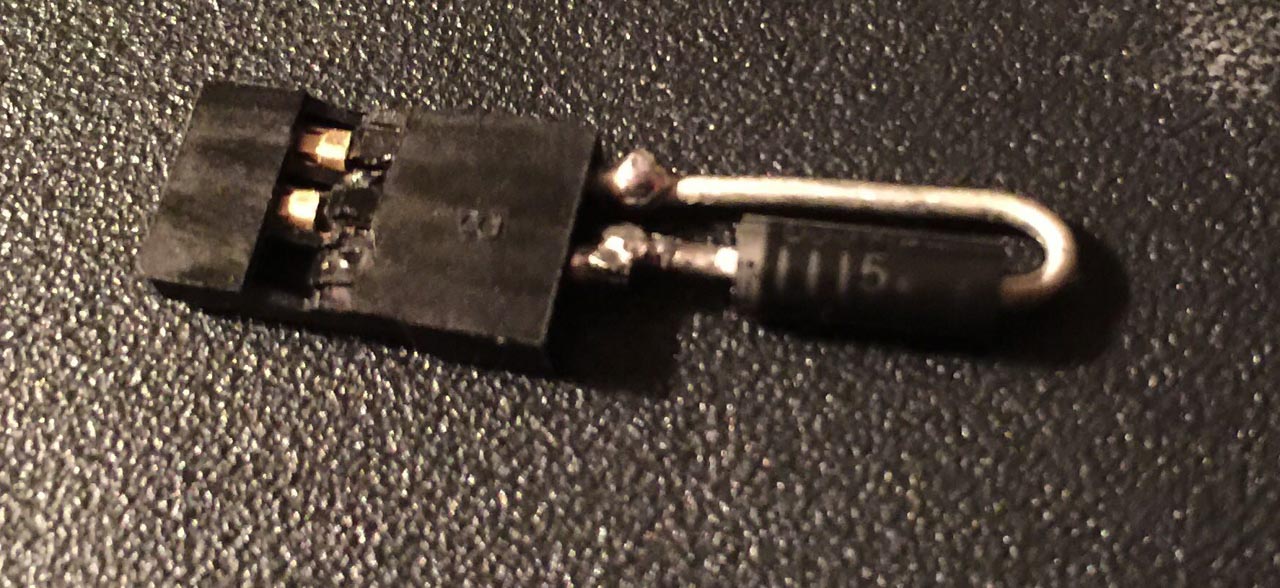
There is a recommendation to add a zener diode to the servo rail on the Pixhawk if it is powered via the servo rail, mine is powered via the pover module but my backup power is via the servorail so I ordered a couple of 1N5339 zener diodes.

The + side of the diode should be connected to ground on the power rail and vice versa, I've soldered the diod to a JR servo connector. I will probably add a capacitor in parallell with the diode later as this is also recommended.
Added LEDs for better orientation part 2
Was out and tested the T810 again, the orientation is much easier now with the LEDs
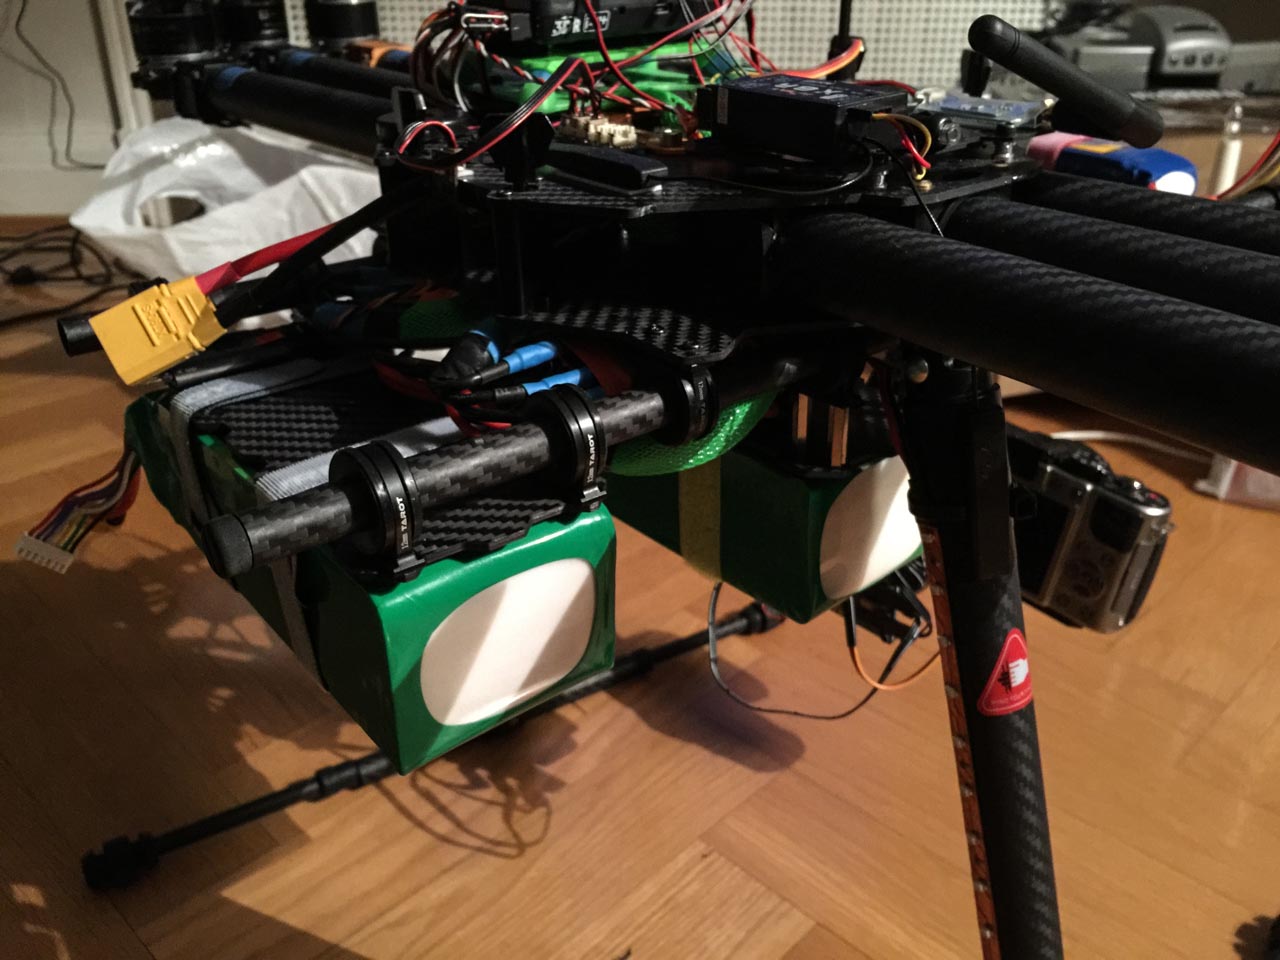
Added a second battery mount
I wanted to have a battery mount for the second battery in the middle so it would be easier to balance the hexa, now I can either fly with only one battery in the back and the gimbal in front and the hexa will be balanced and I can mount a second battery in the middle. The battery plate wouldn't fit under the power distribution board so I bought a couple of standoffs.
The second battery plate fits really nice under the power distribution board.
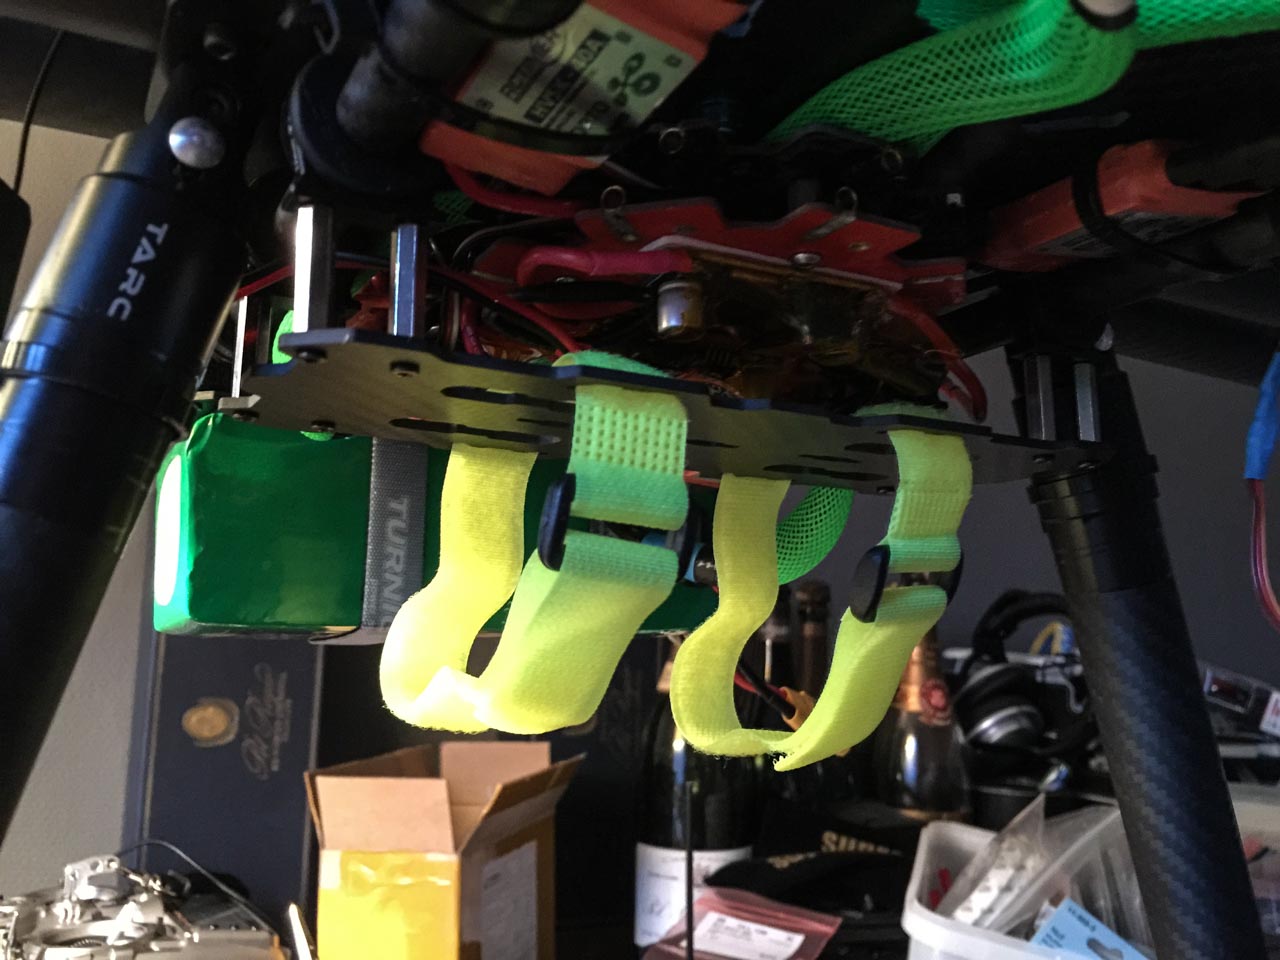
Both batteries in place, the balance feels really good need to weight the hexa now.
Added a second battery mount
The curent sensor on the power module I'm using is only rated for 90A so I have bypassed it, I still want to be able to sheck current draw so I've bought a Frsky current sensor, this sensor is using hall effect to measure the current draw so it feels mych fafer to use a sensor like this.
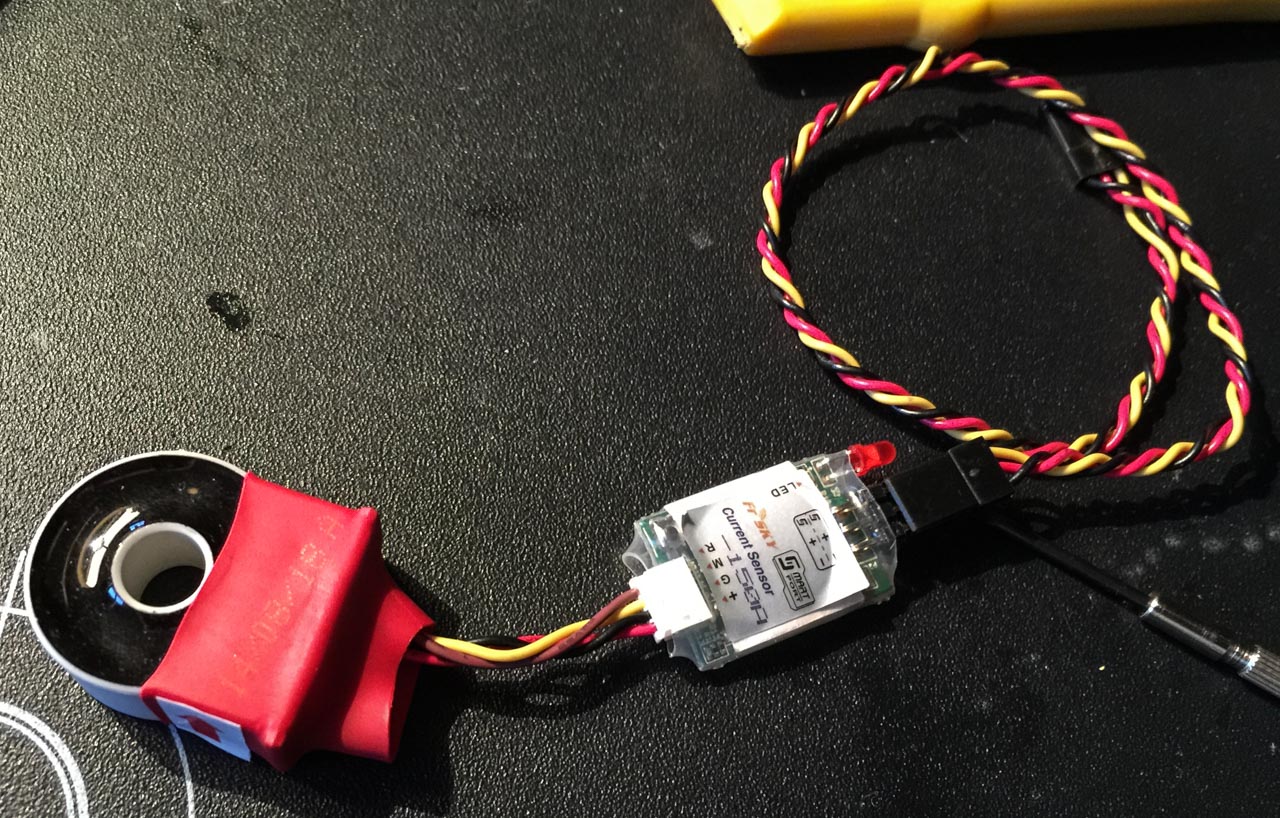
I've put it on the plus cable direct atrer the battery connector and now I can see the current draw directly on my Taranis radio but I hope I'll be able to connect it to the Pixhawk so I can get current draw there to.
